
How-To Process 1099s in Dynamics GP
During the tax season it is important to know how to look up 1099 amounts, correct them if needed, and generate the report. The IRS has changed the 1099s format this year so be sure to use the latest version. For further questions on this update, or to make sure you have updated correctly, contact support@BondConsultingServices.com
To review the 1099 vendor amounts, you can use the Vendor 1099 Information report. The report can be found in the vendor lists window under Reports > General or within the vendor card under Report > Vendor 1099 Information. This report includes all 1099 information for the vendors that been setup using the IRS 1099 Form-box tables.


If you do not want to run a report, another option is the Vendor 1099 Statistics window. To access this window, open the vendor card and under the Navigate menu select History > 1099 Statistics.

Within the Vendor 1099 Statistics window you will have an overview of the 1099 amount totals for the selected vendor.

If you need to correct any 1099 values, you would need to update the vendor ledger entries. Please find the steps below:
- Navigate to the vendor list and open the vendor you need to correct.

- Select Vendor > Ledger Entries

- In the ledger entries, you can scroll over to the right where you can find the IRS 1099 Code and IRS 1099 Amount. Here you can update those values as needed so the report can get updated.

Once all is correct, you can run the 1099 report by following the steps below.
- In the Global Search enter “Vendor 1099 Nec” and select the option in red below.
(NOTE: There is a new version of 1099 NEC for 2021 that is for three in a page.)

- Enter the Calendar Year you are running the report for and then select the destination of the report.

The 1099 report will then generate and you can confirm that it aligns with the preprinted forms that you have. For further inquiries about this procedure or other aspects of Dynamics GP please contact support@BondConsultingServices.com

How-to Change the MFA Authentication Methods in Entra AD
Recently one of our clients has requested assistance managing the Security of their Microsoft Azure logins, specifically the multi-factor authentication (MFA) process. With the multi-factor authentication process, an individual will need a login and password as well as an additional key to access the system. This key/additional authentication is primarily accessed and approved through a phone via application or SMS text. This method can be set for all users or customized based on an individual user basis. This ensures that access to your business’ sensitive information is kept secure even if one of the factors is compromised. This tool is important in maintaining your business’ cybersecurity and protecting you from cyberattacks.
To access the MFA management panel in Azure, follow these steps:
- Go to Azure Active Directory
- Select “Security” at the bottom of the “Overview” menu

- Select “Authentication Methods”
- Select “Policies” to customize the MFA to suit your organization’s needs

To manage your MFA in Office 365, follow these simple steps:
- Log in to Admin Center
- Select “Active Users”
- Select “Multi-Factor Authentication”
- Customize the MFA to suit your organization’s needs.
For more assistance managing your MFA, please reach out to support@lime-falcon-860444.hostingersite.com

Power BI Date and Time in Desktop vs Service
In Power BI, if you have been using date and time data for long enough, you may have noticed a peculiarity with how your time works in Power BI Desktop, compared to Power BI Service. This is because Power BI Desktop uses your computer’s local time, whereas Power BI Service uses UTC time. This can cause a plethora of problems with reporting the correct date, functions choosing current day, etc. Below are 3 possible methods to get around this issue.
Method 1: Connect to a web source
One method to get the correct DateTime is by connecting to a web service to return the local time of whatever region you need. After connecting to this source and doing some simple reformatting, you have an updatable and reliable way to get your preferred time zone. In our case, we most recently used this as a simple way to show the most recent refresh date of the report in Pacific time.

You can see a full list of this site’s time zone options here: https://worldtimeapi.org/timezones
Method 2: DAX Measures
Probably the easiest method to use is by simply adding or subtracting the difference of your time zone and UTC time from the DAX NOW() function.
![]()
This method is very easy to put together, simply Google your time zone offset or look it up on a site like below. Then, add or subtract the total from the now function, and you have your proper time in Power BI Service.
https://www.utctime.net/time-zone-abbreviations
It is worth noting however, that this method a notable downside. In Power BI Desktop, your time will appear as the computer’s time +/- your offset, rather than UTC +/- the offset, this may make it difficult to test some reporting elements, as they will appear differently in Desktop and Service.
Method 3: Power Query
Power Query has inbuilt functions to deal with this issue, namely the DateTimeZone functions. Using the SwitchZone function, it is easy to select your preferred time zone via the method below. As before you can see the -8 offset for PST from UTC (note the 0 in the optional minutes offset, which can be left blank in many cases). If you have data that needs visibility to your DateTime information within Power Query, this method may work best.

These are three simple methods to get around the date and time subtleties of Power BI Desktop and Service that have repeatedly come in handy at BCS. If you'd like to learn how Bond Consulting Services can help implement Power BI at your company, contact us at sales@lime-falcon-860444.hostingersite.com.

How can I track Jobs or Projects in Business Central
The Jobs Module within Business Central helps you manage various projects. You can track employee work hours through the Time Sheets function, monitor budgets and actual usage, view inventory and resources assigned to the jobs, invoice a customer, or make purchases linked to the job.
Let’s review an example of the project:
Within each job you can assign prices to Resources, Items, or G/L Accounts in order to track costs and budgets.

The period and progress of each job is also displayed here to allow a thorough view of operations. With the next layer as a Job Task, you can post and review the completion of the job.
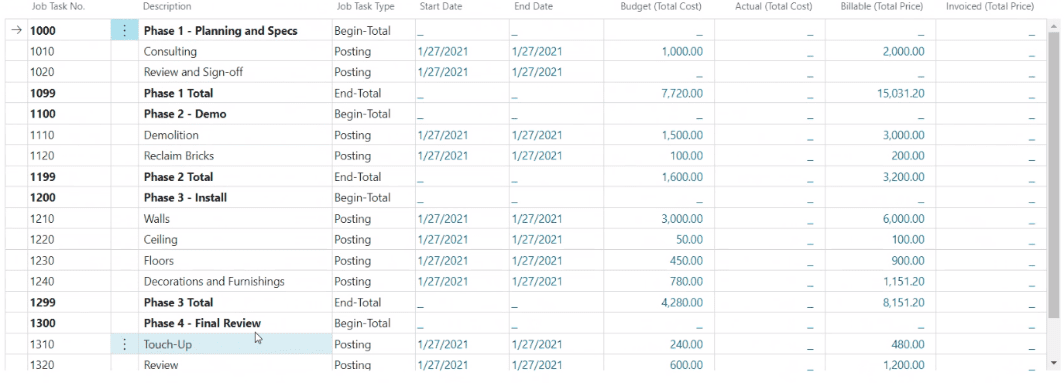
Having layers in a project allows you to divide the job into smaller tasks, and therefore use more specific details in budgeting, quotes, and registration. The visibility to each step allows you to see if you are meeting defined targets or if your budget expectations are met.
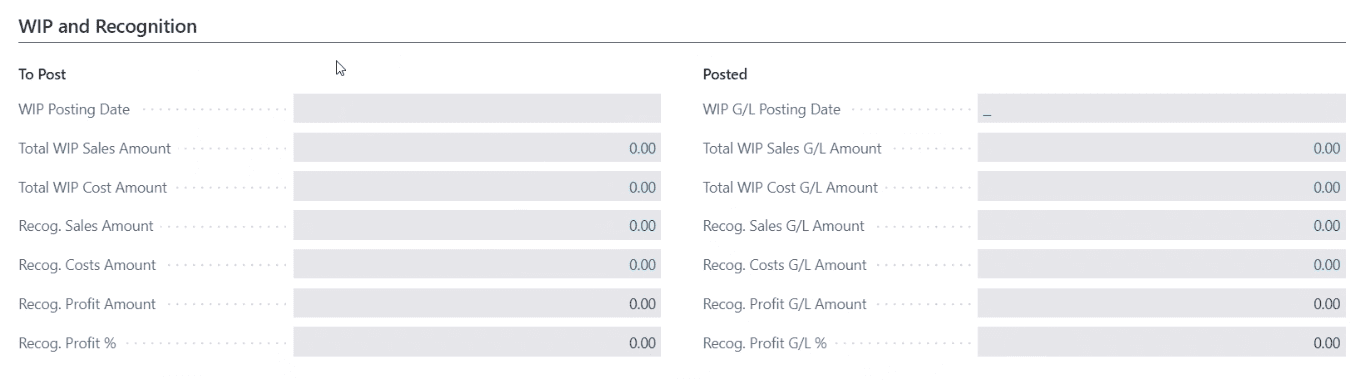
You can change the status of the job as it progresses and monitor Job Progress and Performance by making Work in Progress (WIP) calculations.

You can use Jobs module even if your business model is not around jobs. It can be used for various projects within the organization, whether it’s product development or even marketing efforts.
For additional questions about the Jobs module please reach out at support@lime-falcon-860444.hostingersite.com

What Is the Omnichannel Extension for Dynamics 365 Customer Service?
Omnichannel is an extension for Dynamics 365 Customer Service that allows for enhanced customer engagement through a suite of new capabilities. One of these such capabilities generates and tracks service cases through a chat channel where customers can interact with you on your website. If a viewer needs help or has a question about something they find while browsing your website, they can use the chat feature to send a message directly to Customer Service.
Chat channels are the preferred communication method for a large population of customers when reaching out to a business entity. Customers and clients value being able to talk to real people instead of machines. Adding this channel to your website will therefore make you more approachable to the average customer.
The Omnichannel extension will serve as a hub for all of the cases created through the website chat function. It tracks the inquiries and assigns employees to address them. It is a useful tool for anyone managing Customer Service endeavors, however an additional license is required to access Omnichannel for Customer Service.
Omnichannel also allows for communication within the dynamics portal through SMS/text and certain social media channels such as Facebook.
For information on the price of these licenses, see the Dynamics 365 Customer Service pricing overview and Dynamics 365 Customer Service pricing plan pages.
For more details on Omnichannel’ s capabilities please see this Microsoft article.

How-To Manage Security Using Permissions and Permission Sets
A permission or permission sets are used in Dynamics 365 Business Central to grant access for a user or user group based on the job requirement of the team member(s).
In an organization, there will be users who will have a full user license called “Super user” and access to the complete Business Central application. The “Super user” will be able to control the user access of all users in the organization by using user group, permission sets and permissions. This can be possible by setting up the permissions to Read, Insert, Modify, Delete and Execute permission for each User, controlling the user’s access.
If you happen to be a team member in the Assembly Department and your job consists of Assembly orders, please follow the below guide to set up the appropriate permissions for this specific user.
Step 1: Search for “Permission Set” in Global search.
Select the appropriate link to open the “Permission Sets” page.

Select “New” to create a new permission set.

Step 2: Name the new permission set created. In this case, we will name it “BASIC_ASSY”.

Step 3: By keeping the cursor in “BASIC_ASSY”, select “Permissions”.

Step 4: Now you will see the below page, where you can select the required Table Data & pages related to Assembly in the “Permissions” page.

Step 5: All the Table data and Page related to Assembly Order are selected as shown below.
Here you can see the required Read, Insert, Modify, Delete and Execute permission for each “Object type”.

Step 6: Search for User group in Global search and select the appropriate link to open the User Group.

Step 7: Select “New” to create a new user group and let’s name it as “BASIC”.

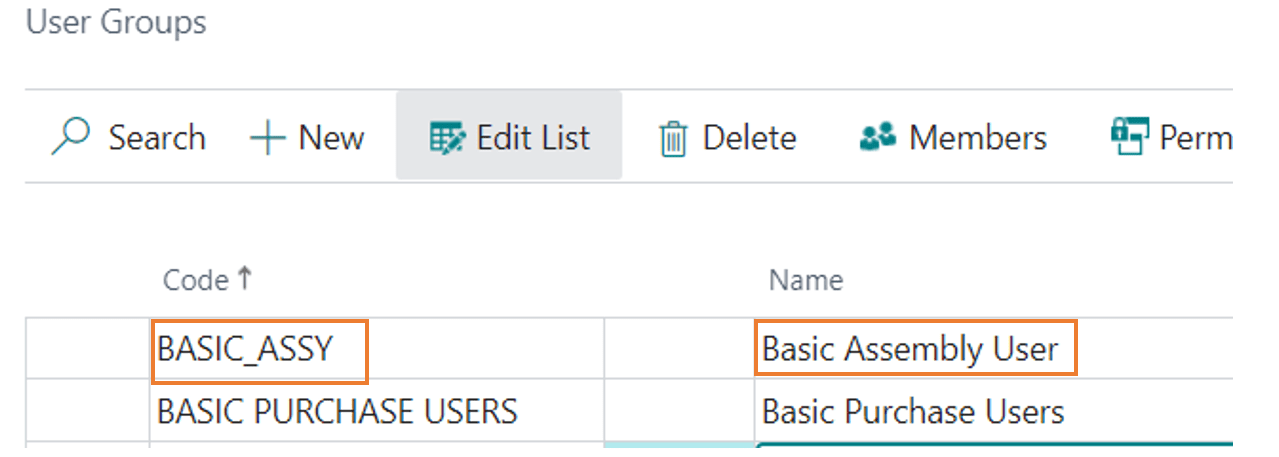
Step 8: Now keep the cursor in the created user group “BASIC_ASSY” and select “Permissions”.

Upon selection, we can see the below image.

Now select the three dots and select the Permission set (BASIC_ASSY) you have created in previous steps.
Select the created permission Sets “BASIC_ASSY”.

Step 9: Now from the User group page, you can select “Members”.

Now assign users to this group.

Step 10: Select the appropriate user in “BASIC_ASSY” group. The user is now set to use the Assembly related activity with the set permissions.

Important Note: There might be relevant master table, table data, pages required for using assembly / Assembly related activities, and accordingly we need to select those during creation of “Permission Sets” shown in above steps.
For any other Microsoft Dynamics 365 inquires – Contact us at support@BondConsultingServices.com

How-To Schedule the Automatic Email of a Dynamics GP Report
A key feature of the reporting tool within Microsoft Dynamics Great Plains (GP), is known as SSRS, SQL Server Reporting Services, it has the ability to send out important reports on a timely basis. This means that admin users can automate their SSRS to send reports directly to key personnel through subscriptions. By managing these subscriptions, you can customize who gets sent which reports, the method of delivery, and the frequency.
If you have SSRS, follow the steps below to manage your subscriptions. If you would like to learn more about Dynamics GP or set up SSRS capabilities, schedule a free consultation to chat with one of our experts.
Steps:
- Login to SSRS.
- Click on the Report for which you would like to set up an email subscription.

- Manage the report by clicking on Subscriptions > New Subscriptions.


- Edit Schedule – make sure to add any details you need for the email subscription.

- Create subscription.


How-To Do a Point-In-Time Restore to a Business Central Environment
If you have discovered that unwanted transactions have been posted in Business Central’s production environment, it is very easy to restore Business Central to a point in time prior to this emergency.
In fact, a Business Central administrator can restore to a certain point in time as far as thirty days in the past using the Business Central Administration Center.
Restoring from a backup can eliminate the hours or even days that may be incurred in implementing “fixes” or workarounds.
Prior to restoring a production environment, follow these steps in the Administration Center:
- Rename the original production environment (for example, MyProdEnv-DONOTUSE).
- Make a point in time restore of the original environment into a new production environment with the original name (MyProdEnv).
To conduct this point in time restore, follow these steps in the Administration Center: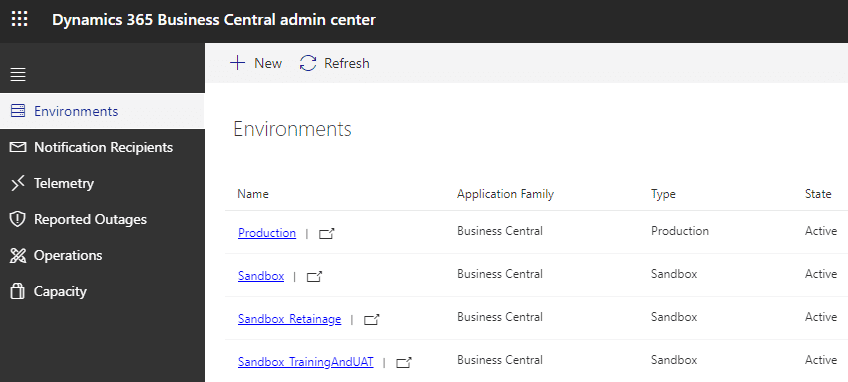
- Select Environments, then, open the environment you want to restore.
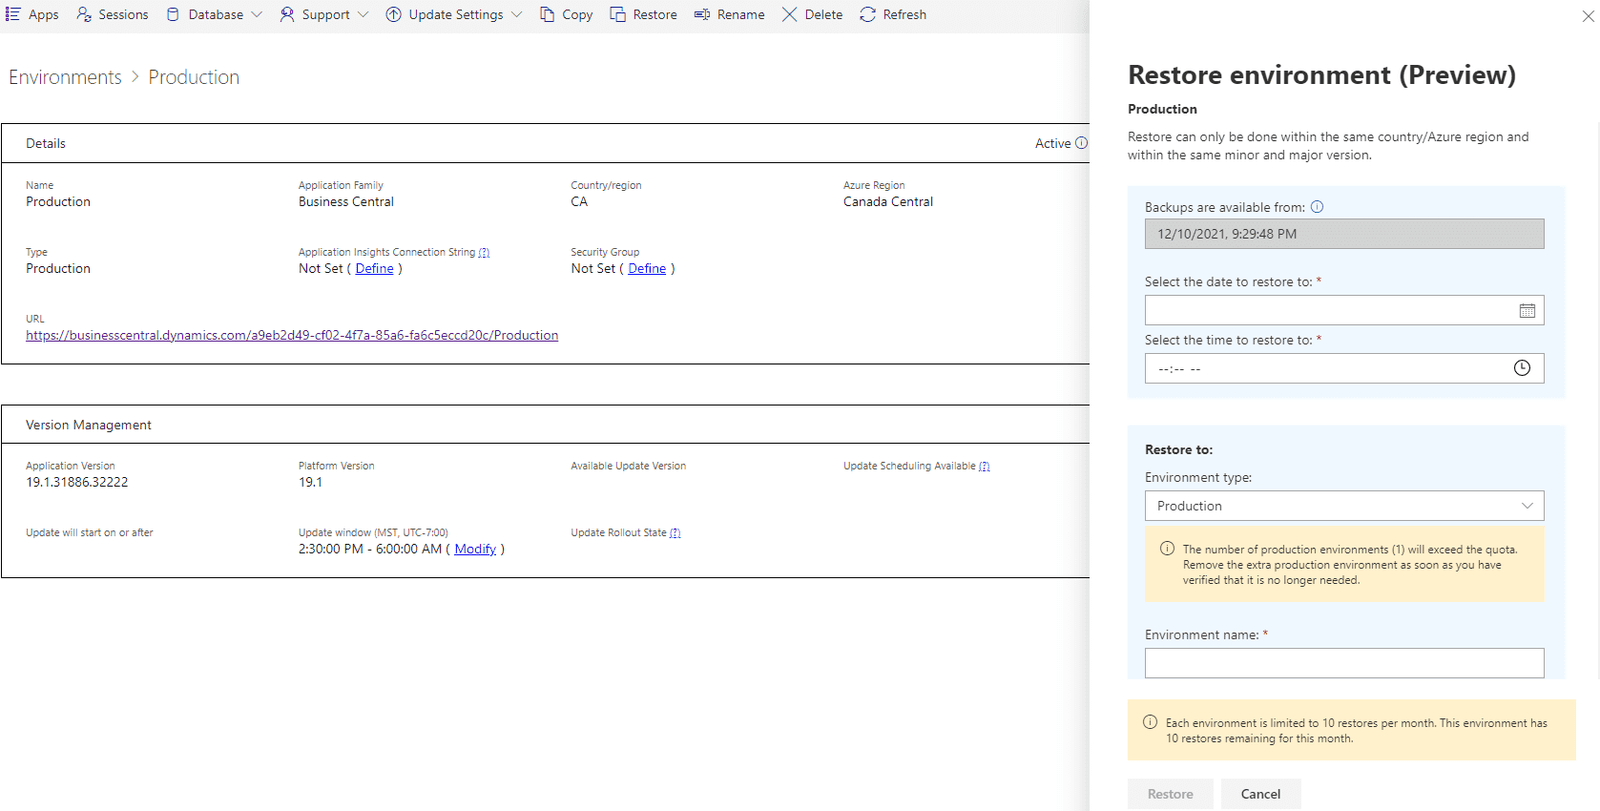
- Select Restore at the top of the page.
- In the Restore Environment pane, specify the date and time in the past to which you want to restore the environment.
- Select the type to be used for the restored environment.
- Specify a name for the restored environment.
- Select Restore.
If there's no backup available for date and time you chose, select the available nearest backup when prompted. This situation can occur, for example, if the environment was being updated to a new minor or major version during the specified time.
When the process starts, you can go to the list of your environments and see the status of the restored environment. At first, you'll see the new environment with state Preparing. The original environment state remains as Active.
Once the restore is completed, the environment state will change to Active. If the restore operation fails, you can find the failure details on the Operations page. In this case, delete the failed environment and then try to restore again. Contact Microsoft Support, if the issue persists.
IMPORTANT NOTES
- You can restore your production environment into a new production environment, even if doing so results in exceeding your number of environments or database capacity quotas. You can however only exceed this quota by one extra production environment, regardless of how many production environments you have available for your subscription. You must return to within your quota within thirty days following the restore, by either removing the original production environment or by purchasing an additional production environment. Before removing the environment, we recommend you export the environment to an Azure storage container in case you need to access some data at a later point. In our example from earlier, you will need to delete the “MyProdEnv-DONOTUSE” environment in the Administration Center.
- Per tenant extensions that you may have uploaded that target the next version of Business Central will not be available in the restored environment, even if they were uploaded at the point in time that you are restoring to. Per tenant extensions that were already installed will be available in the restored environment.
- Every AppSource and Business Central application in the restored environment will have the latest available hotfix, even if the hotfix was introduced after the point in time that you are restoring to.
- System backups are managed directly by Microsoft and are produced continuously by the Business Central service, called Azure SQL Database. These database backups are kept for twenty-eight days.
- The number of restore attempts will be limited to ten attempts per environment and per month.
- The duration of the restore operation is affected by several factors. For small environments, the restore will likely take less than an hour. For large or highly active databases, the restore might take several hours.

Access the Detailed Menu Option in Business Central version 19
A new feature of the Version 19 update for Microsoft Business Central is an addition to the menu layout. This addition allows for deeper visibility with detailed reports and roles on an expanded view. This new feature is useful for everyone using Business Central, but especially those who are consistently viewing these reports. No longer will associates need to know the exact name of the report to search for it, they are all easily accessible through this new view.
To access this new menu view, follow these steps.
Select the three lines icon in the top right of the main Business Central tabs.

Next, you will see the current menu view with all of the traditional reports separated based on each branch of business. Select “Explore More Roles” at the top of the screen to see an expanded view.

Here is the expanded view with important roles in the same view as those key reports.

For more information about Dynamics 365 Business Central or other Microsoft products please reach out on our website or schedule a free consultation with one of our experts to evaluate your business' ERP and CRM needs.

Add Detail to Financial Reports within Business Central
Our experts at Bond Consulting Services have developed many reports (customizations) to boost the transparency and ease of use for complex systems. One of these such customizations improves accounting processes within Microsoft Dynamics 365 Business Central by adding columns to the financial reports. Having key fields such as percentages automatically generated when creating the report will streamline internal analysis, forecasting and other processes utilizing these reports.

These steps can help accountants eliminate the need to export data to excel to generate these percentages, it’s all done in Business Central.
In this scenario, we will build the Income Statement report by using Cronus data; this report will include columns that calculate percentages of a total, as well as the Year to Date (YTD) values, where we can see a period from the beginning of the current year to a specified date.
Step 1: In the Accounts Schedule window, select a report.

Step 2: In the Account Schedule page:
- Insert a line above the first row for which the percentage will be displayed.
- In the Totaling Type field, select Set Base for Percent
- In the Totaling field, enter the Row No. for the total from which the percentage will be based

Step 3: Choose the Edit Column Layout Setup action to set up the necessary columns; we have eight in our example.
Populate the fields on the line as follows to calculate percentages based on the Current Period Actual column,
- Fill in the Column No. field, for example: COL1.
- For the percentage column, change the Column Type to Formula
- In the Formula field, add the first (COL1) column name with the percentage sign. You can add the negative sign if necessary.
To calculate Year to Date Actuals, add FY[1..CP] in the Comparison Period Formula column. FY denotes the fiscal year, and CP denotes the current period of a fiscal year. And finally, we use -1FY formula to denote the current period in one previous fiscal year.

For any questions related to these capabilities or other general information about business central please reach out and schedule a free consultation with one of our experts.