
Power BI in Microsoft Teams
Since November 2, the Power BI App for Microsoft Teams has become generally available to Teams Users. Within the Power BI app for Teams, you can utilize nearly all the functionality Power BI Service has to offer, without having to leave Teams. Other functionality such as sharing reports within Teams, pinning reports in Teams chats, and even analyzing your Teams usage data is all now possible via Power BI for Teams.

Collaboration in Teams
Many new functions make sharing and communicating easy with Power BI. One great functionality is the ability to pin Power BI reports to a Team or Chat channel by pressing the + symbol at the top of either channel.

From here you can select the Power BI app, choose a workspace and report, and it will immediately become available to anyone in that Team with proper access to the report.

You can also use the "Chat in Teams" function to share a report or visual with any person, group, or channel in your Teams network.
![]()
Analyzing Teams Data
Power BI in Teams also provides interesting analytics of your Teams data when you create new reports. To access these insights click on the Power BI tab on the left side, then select "Create" to see the analysis button.

Selecting the "Analyze your Teams Data" button automatically creates a report with key metrics for your data. One of these such reports is shown below.
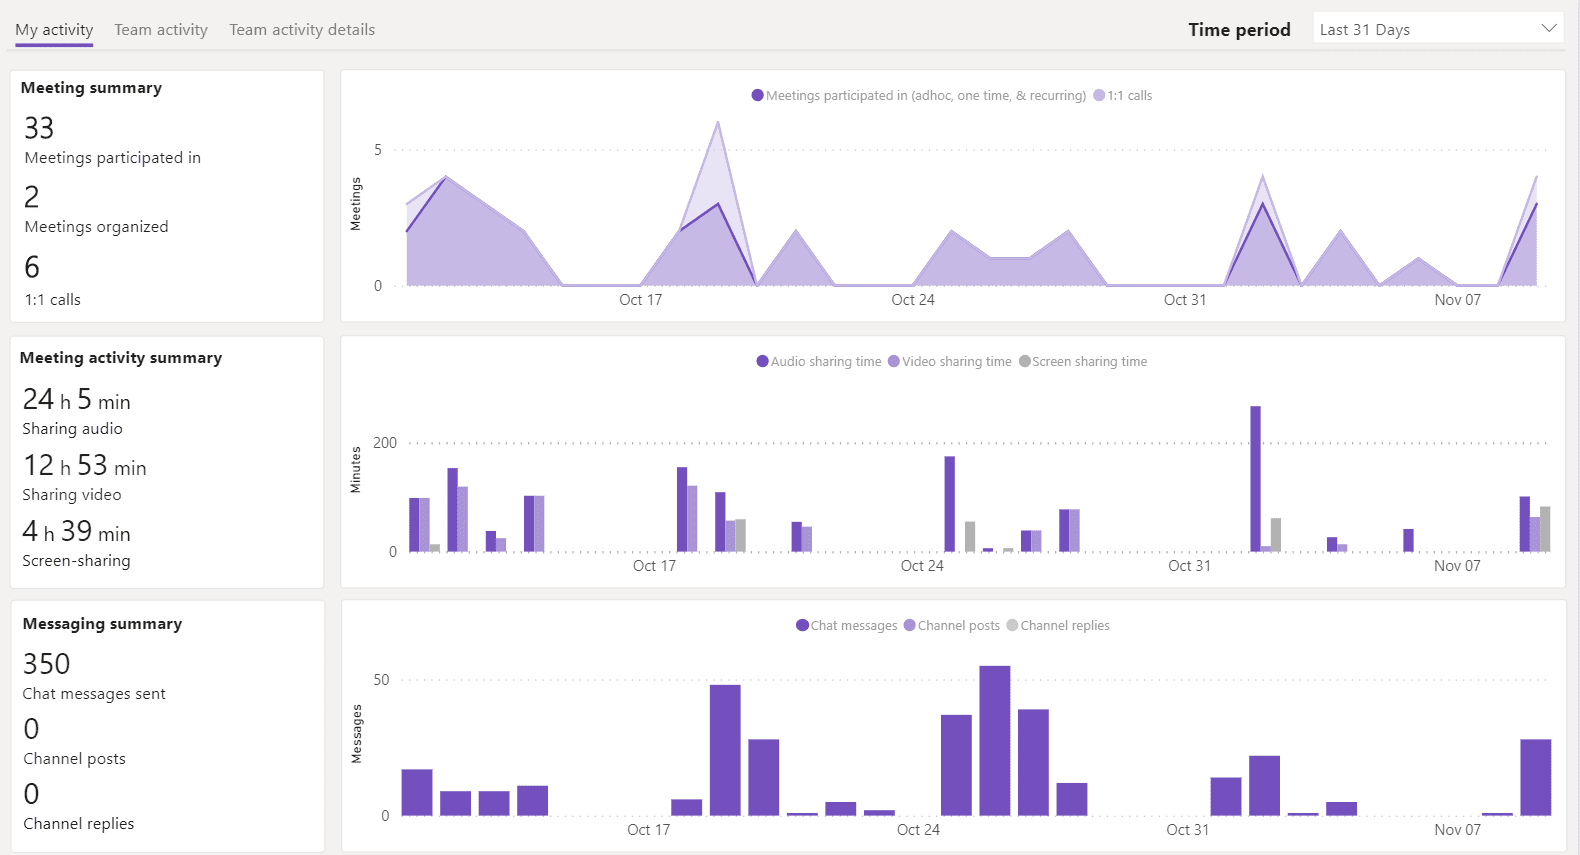
This is only a sample of the functionality the Power BI Teams app adds; from adding Power BI goals scorecards to Teams, access request notifications, organization wide installation options and more options available, and more likely to come, Power BI in Teams seems like an impressively easy to use and beneficial way to consume your regular Power BI data.
For more information about Microsoft ERP products browse our website or YouTube channel for helpful videos! You can also schedule a free consultation with one of our experts.

Excel Enhancements for Business Central (update version 19)
With the release of Business Central version 19, Microsoft has made changes to the commonly used “Open in Excel” and “Edit in Excel” Options. Now, there is a new Share icon that has been added to the top right of the pages where you can now find these options.
 This option has also been added to list pages that are embedded to pages like the sales lines on a sales order.
 In addition to the new icon, there were also other enhancements included with the new release which include:
- Captions in the excel file have now been updated to match the captions within the Business Central client in the user’s current language.
- The names of the files exported when using Open in Excel or Edit in Excel have been updated to match the name of the page.
- In the Excel Add-in, the error messages have been improved to provide more details to help troubleshoot issues.

Bank Account Reconciliations in Business Central
One of our experts at Bond Consulting Services has been working on resolving bank transactions in Business Central. The process described is helpful for accounting professionals or anyone managing transactions to fulfill their daily tasks. To reconcile bank transactions in Business Central follow these steps:
- Select the bank account that you want to reconcile, and on the General FastTab, enter the following fields:
- Statement Date you are reconciling
- Statement No.
- Statement Balance from the bank
- Select Process > Select “Suggest Lines” to populate the bank reconciliation with all posted bank transactions.

- Under Record type to process, select the posting date filter, so the system only pulls transactions for the given period. Click “Ok” to pull the transactions.

- The system will pull the transactions and add them to the corresponding sections. At this point, the Bank Statement Lines now displays the bank statement lines that are applied with the open bank ledger entries that are displayed in the Bank Accounts Ledger Entries window.

- To remove entries that do not appear in the bank statement, on the "Bank Statement Lines" side, click Select More > Delete Line. Business Central will automatically remove the application on the Bank Account Ledger Entries window and the non-reconciled transactions can be used on the next period or reconciliation.

- To add the bank related transaction that are not in the system, manually add the line in the Bank Statement Lines window and populate the Transaction Date, Description, Amount fields. Then select Process > Transfer to General Journal.

- This transaction can be posted in the General Journals window. When posted, Business Central will create a bank account ledger entry that will be included in the bank reconciliation window.
- Once the reconciliation difference is zero, you can post the reconciliation under Posting > Post.

Once posted, you can reference posted reconciliations within the bank account card under Navigate > Bank Acc. > Posted Reconciliations.

For more information about Business Central or other Dynamics 365 products visit our website or schedule a free consultation with one of our experts!
https://lime-falcon-860444.hostingersite.com/schedule-a-free-consultation/

Undo Assembly Process in Microsoft Dynamics 365 Business Central
A recent scenario we have came across is the need to “undo” an assembly order when the assembled product is found defective and will not be sold to the customer. Please follow the steps below to guide you through this process.
Step 1: Go to the “Assembly Order” created for the Parent Item, a linked Assembly order is created automatically.
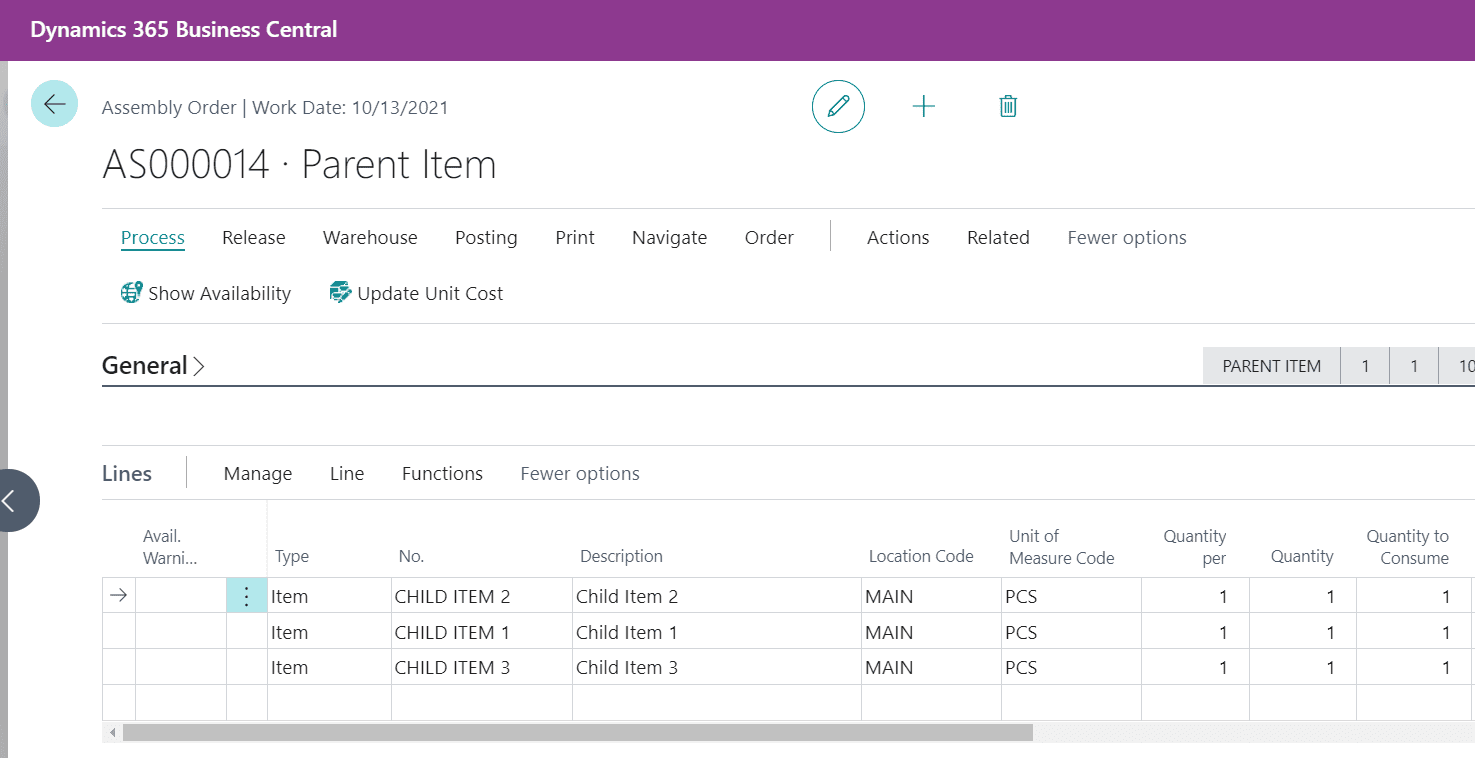
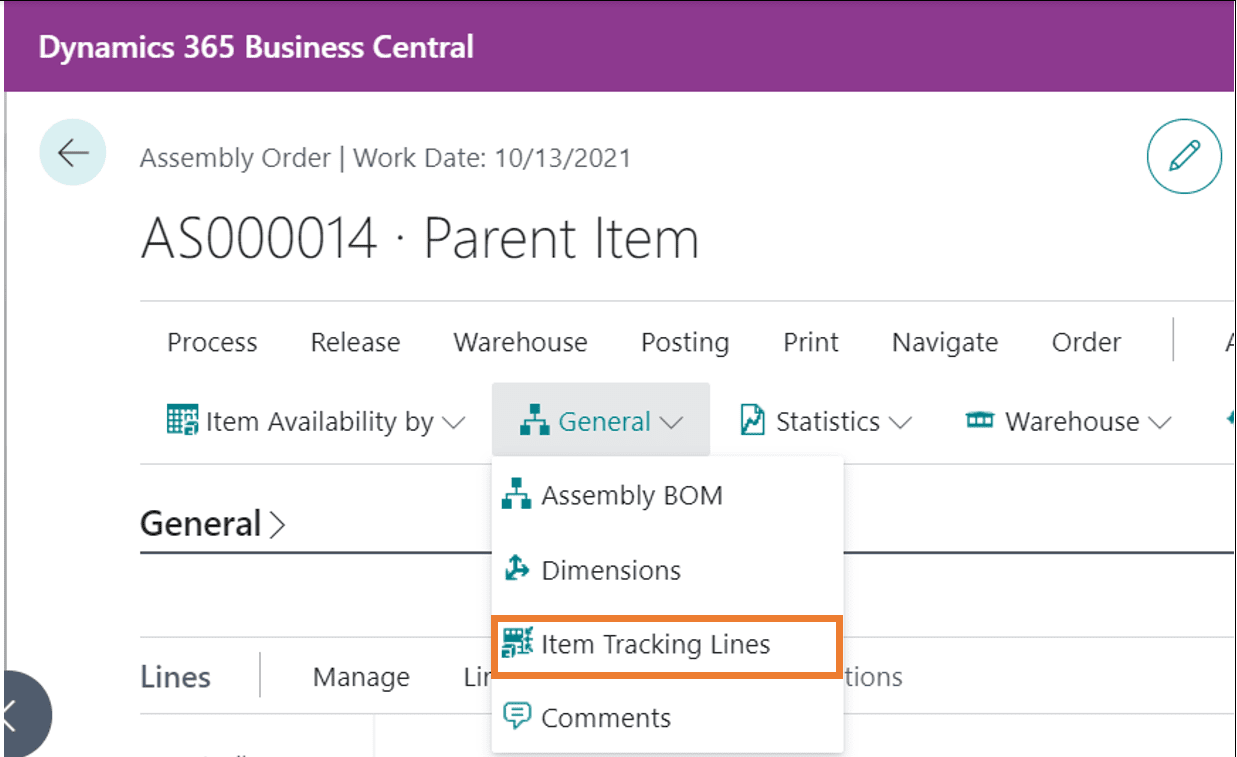
Step 2: Select Item Tracking Lines to assign a serial number for the parent item.
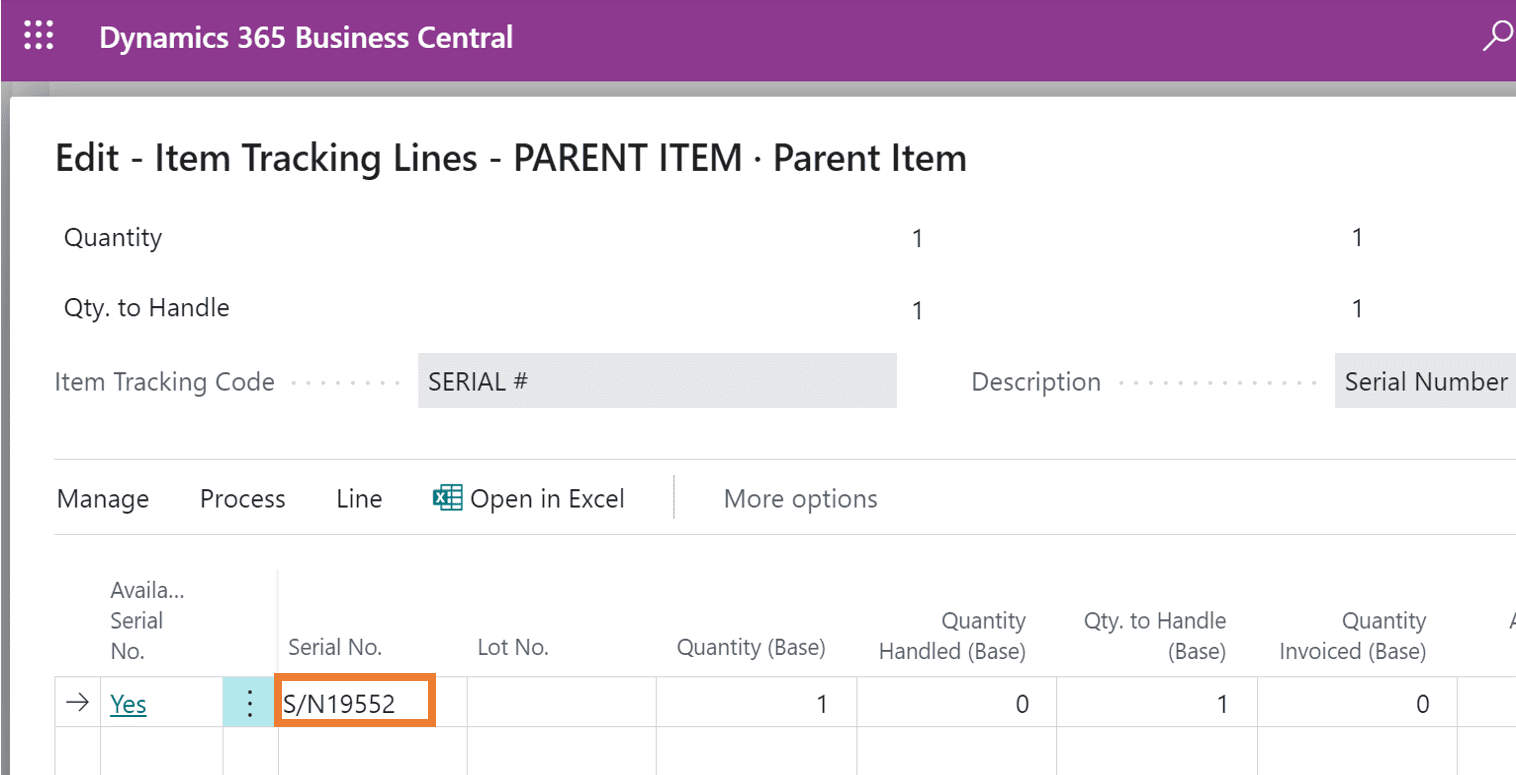
Step 3: The serial number is assigned to the Parent Item.
Step 4: Post the Assembly Order.
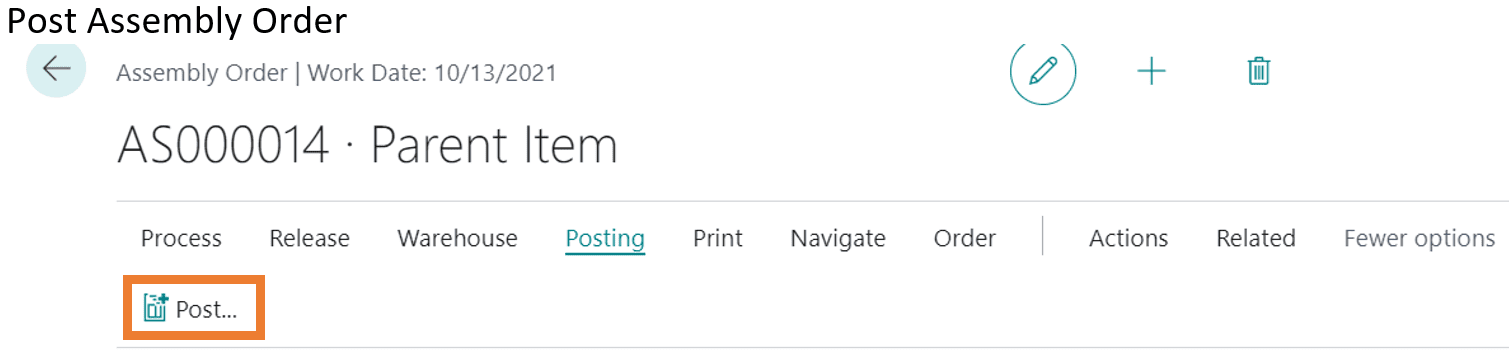
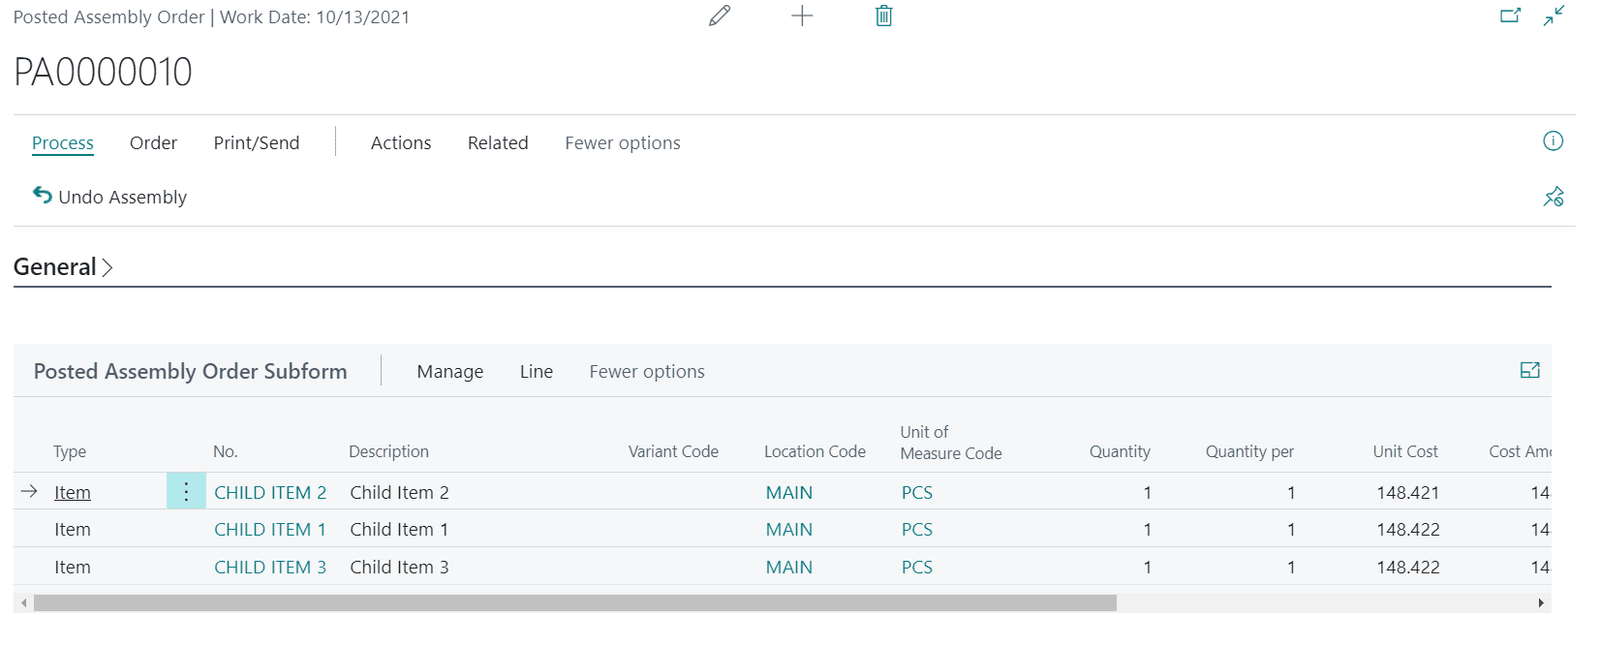
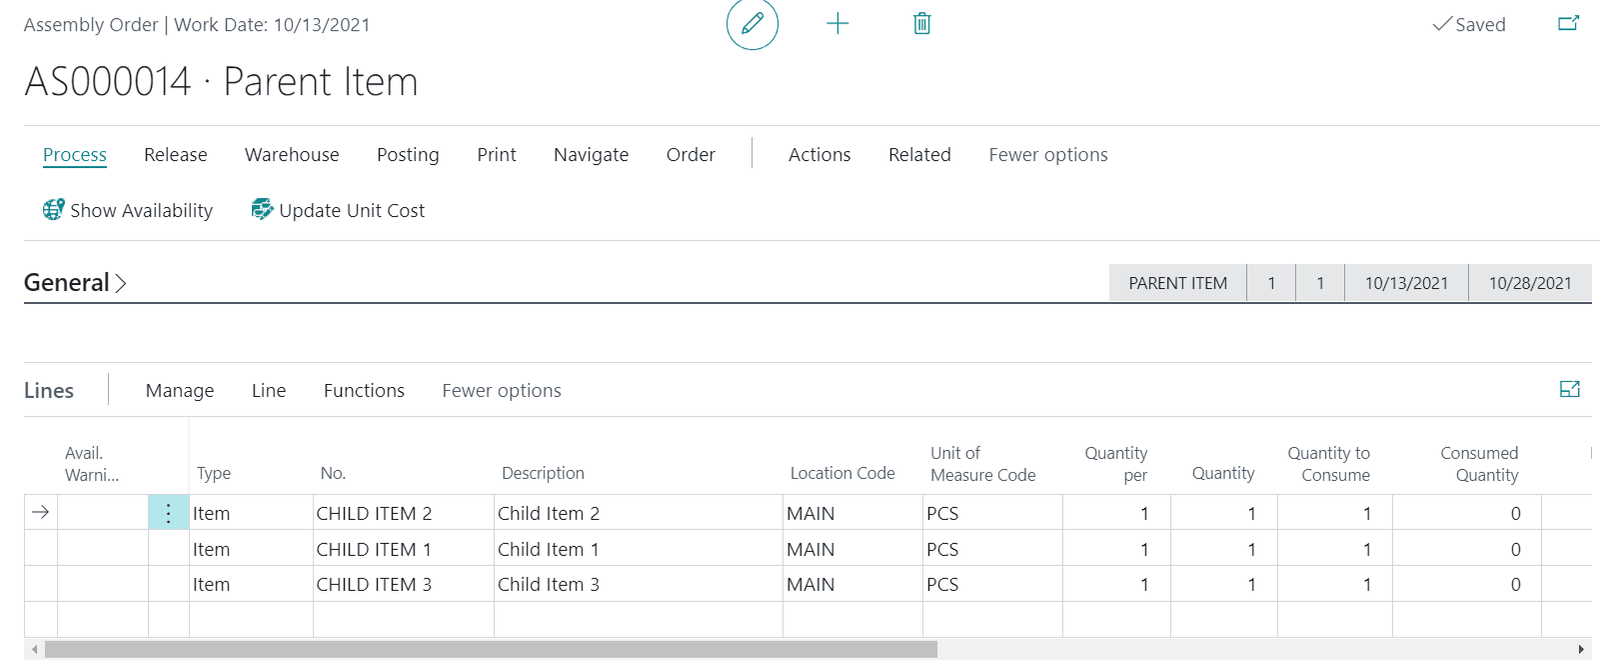
Step 5: The Posted Assembly Order looks like the image below.
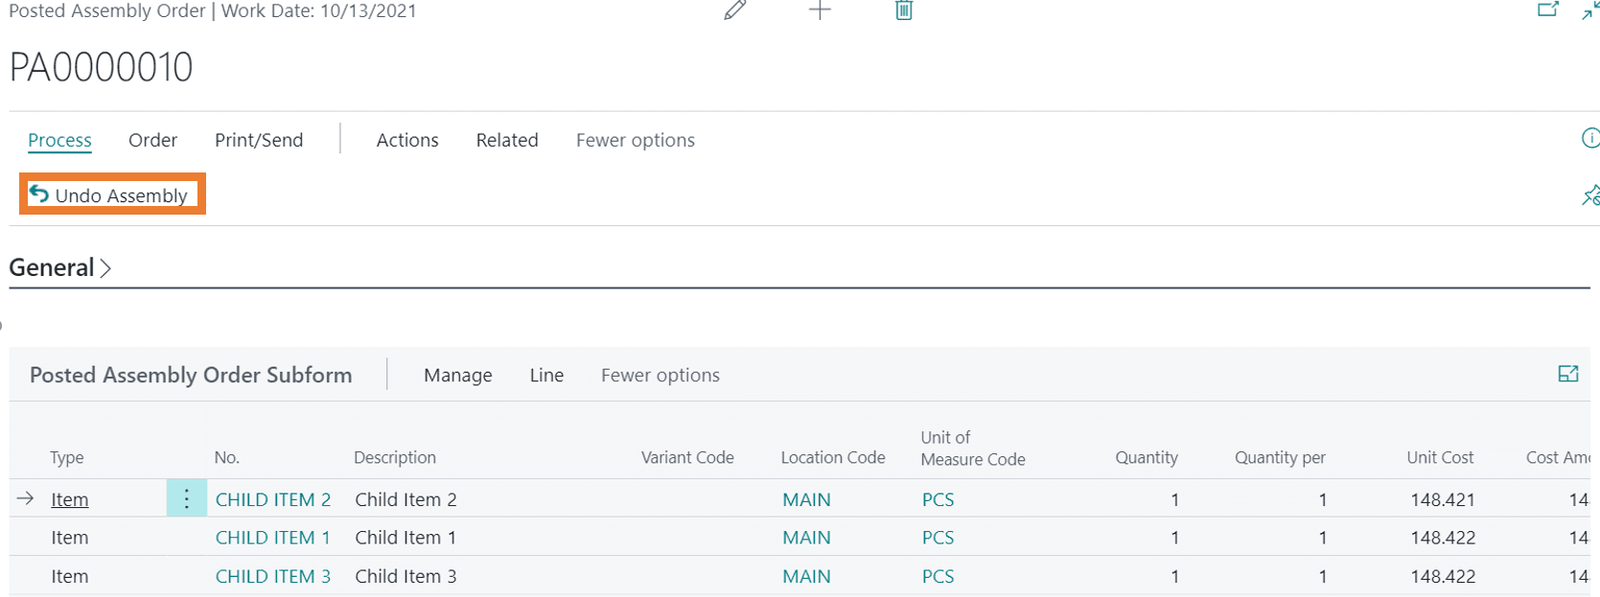
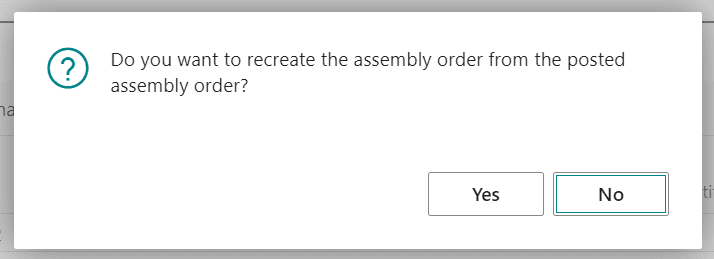
Step 6: Now when a user finds an issue in the assembled product, that user can decide to “UNDO” the posted Assembly order before selling the Assembled product.
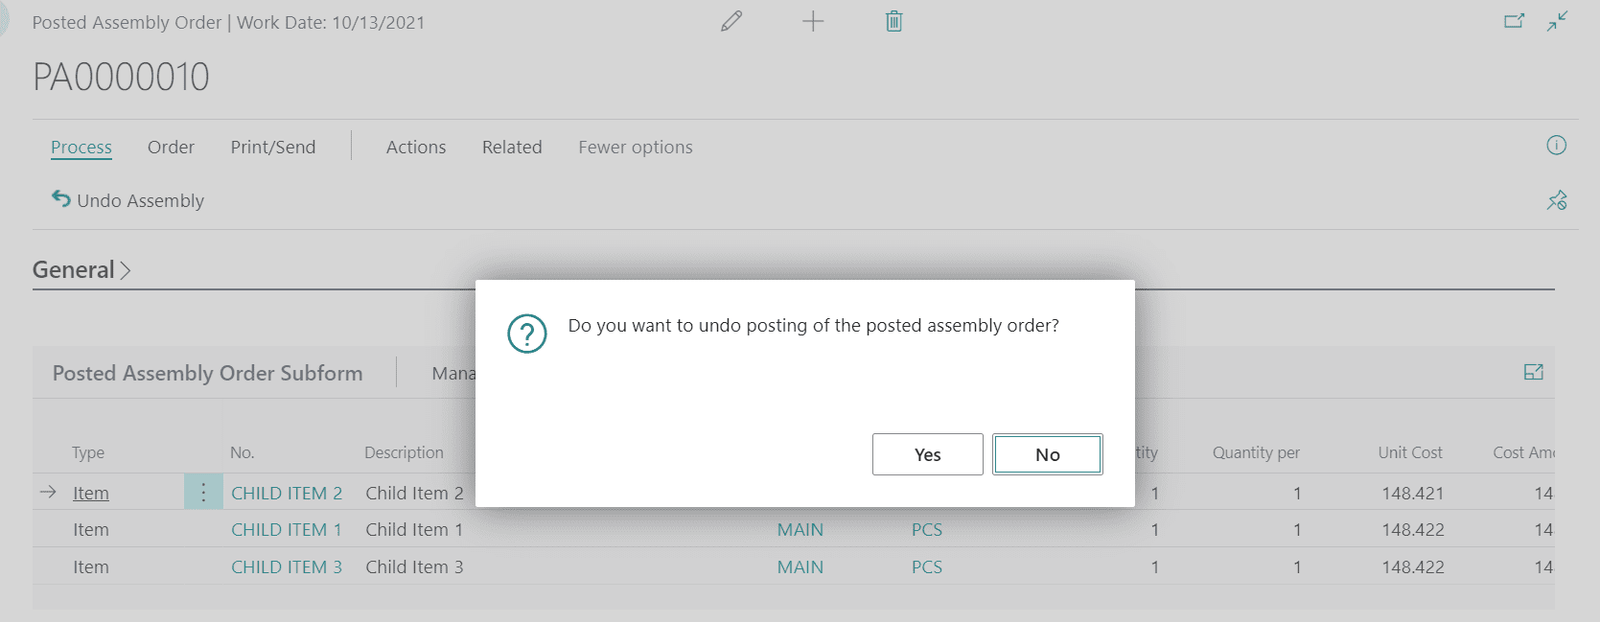
Step 7: Select YES.
Step 8: Then select YES if you want to create an assembly order from the posted assembly order.
Step 9: The Assembly Order is created again. Now the user can REDO the assembly process (by replacing the parts).
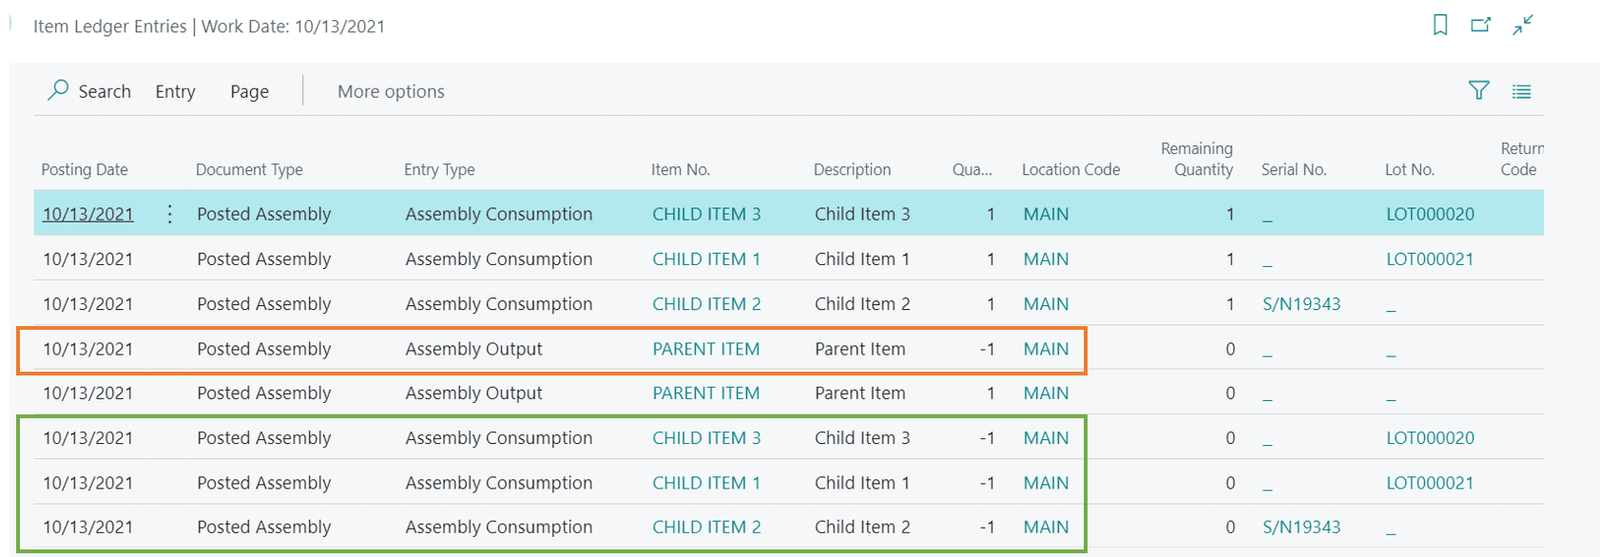
Step 10: Item Ledger entries will look like the image below and we can see the reversal of “Assembly Consumption” and “Assembly Output” entries.
For more information about Dynamics 365 products including Business Central, check out our other blogs as well as our YouTube channel for demonstrations.

Add Detail to the Schedule Board in Dynamics 365 Field Service
Recently one of our experts developed a brilliant process to add more detail to the Schedule Board in Dynamics 365 Field Service. Overall, this will provide more visibility to dispatchers and resources that are viewing the Schedule Board daily. Just a few simple steps by an admin user can add important details to the scheduled work orders.
By default, the hourly view of the schedule shows very little detail for each work order. There is only the resource name/number and “Work Order” displayed during the scheduled time.

Dispatchers and resources would originally have to drill deeper to find key information such as the account associated with the work order, or the projects scheduled to be completed. To secure this improved visibility and ease of use for the hourly view, a System Administrator must follow these simple steps:
Step 1: Turn off the New Schedule Board toggle to be able to edit it.
Step 2: Go to Tab Settings – Initial Public View > Work Order

Step 3: Add this custom script in the Booking Template field
<div style="line-height: 11px !important; width: 99%; overflow: hidden; display: block; text-overflow: ellipsis;">
WO:
<B>{msdyn_msdyn_workorder_bookableresourcebooking_WorkOrder.msdyn_name}</B><br/>
WO Summary: <b>{msdyn_msdyn_workorder_bookableresourcebooking_WorkOrder.msdyn_workordersummary}</b><br/>
Account: <b>{msdyn_msdyn_workorder_bookableresourcebooking_WorkOrder.msdyn_account_msdyn_workorder_ServiceAccount.name}</b><br/>
</div>
Step 4: Go back and see the changes to the Schedule Board

Please Note:
This change affects the Hourly View on the Scheduling Board.
Administrative Users can customize which fields are displayed on the Work Order when looking at the Schedule Board by changing certain parts of the code shown in bold below.
<div style="line-height: 11px !important; width: 99%; overflow: hidden; display: block; text-overflow: ellipsis;">
WO:
<B>{msdyn_msdyn_workorder_bookableresourcebooking_WorkOrder.msdyn_name}</B><br/>
WO Summary: <b>{msdyn_msdyn_workorder_bookableresourcebooking_WorkOrder.msdyn_workordersummary}</b><br/>
Account: <b>{msdyn_msdyn_workorder_bookableresourcebooking_WorkOrder.msdyn_account_msdyn_workorder_ServiceAccount.name}</b><br/>
</div>
If there are any issues inputting or customizing this code, please feel free to reach out at https://lime-falcon-860444.hostingersite.com/ to chat with one of our experts. BCS is always happy to work with you to find the appropriate solution!

Cash Discounts on Customer Payments using Deposits
An inquiry we received from our clients is how to handle Customer discounts while receiving payments from the Customer in Dynamics 365 Business Central (BC). The following scenario will walk you through the process.
Let’s say, “Sale Invoice” created for a Customer for $450. The payment term is 1 month. The cash discount condition is if the Customer pays before 30 days.

Step 1: Search for “Deposits”

Step 2: Create “New”

Step 3: Assume you got a check for $400, where $50 discount needs to be applied for the respective Invoice of $450.

Select Function >>> Apply Entries

Step 4:

Step 5: Set the “Applies to ID” against the respective Invoice entry and update the Payment Discount Date (Pmt. Discount Date) field to current date, enter discount amount as $50.

Step 6: Select Posting >>> “Test Report” to view the transactions before posting it.

Step 7: Select the “show application” (BC will show the entries for the Invoice where discount is applied)

Step 8: The test report will show, what is the Amount Due ($450), Discount ($50), Amount paid by Customer ($400) and Total applied amount ($450).

Step 9: After Posting the deposits, you can verify the posted transactions in Customer Ledger Entry, where the “Remaining Amount is Zero"
Detailed Customer Ledger Entry will clearly show the Total Payment and payment discount applied.

The status OPEN is unchecked, meaning there is no pending payment, and all the payments are received and cleared.


Report Designer Authentication for Dynamics GP Management Reporter
After starting up Management Reporter Report Designer for the first time on a new computer, or after an upgrade, you will likely see the Companies window appear, which will require you to authenticate into your production Dynamics GP databases. When the Companies window appears, you will be presented with a list of companies that you can select from and set as a default company. You need to have one company selected as your default to access the Report Definitions window.
Here is a list of steps to get you authenticated into Report Designer:
- Select a company name and then select the ‘Set As Default’ button.

2. You will have to enter your Dynamics GP credentials and then be sure to mark the ‘Save my credentials’ option on the checkbox and then click ‘OK’.
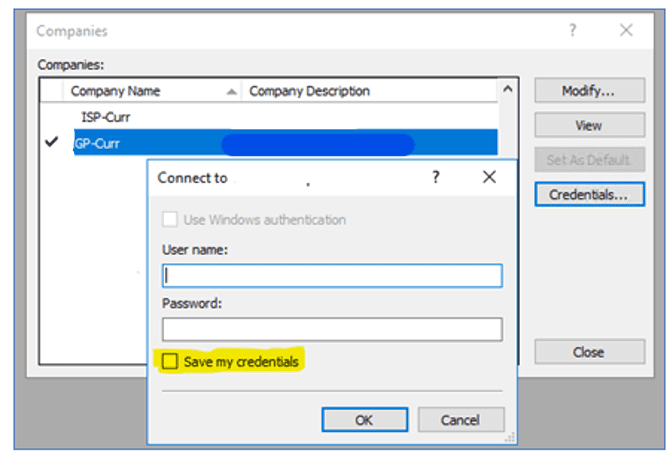
3. In order to access additional company databases, you can select the company name and the click the ‘Credentials’ button to cycle through the process again.
On a separate note, the default viewer for Management Reporter is the HTML viewer which is not the best since you do not get a good preview of how print outs will look.
If you opt to view your financial reports using the Management Reporter Report Viewer, you can set the Report Viewer as your default by doing the following:
- While logged into Report Designer, go to Tools >> Options.

2. Within the Options window, mark the ‘Use Management Reporter Report Viewer as default viewer’ checkbox.
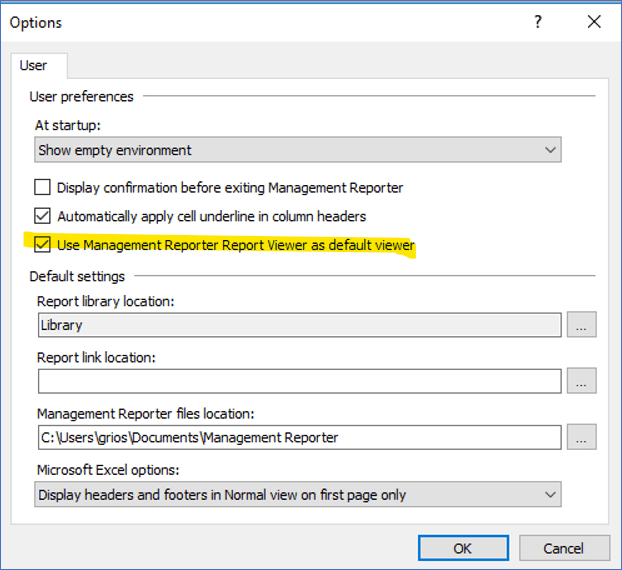
3. Click ‘OK’ to close the window. The next report that is run will now be rendered with the Management Reporter Report Viewer.

Step by Step Production Costing Guide for Business Central
The steps below explain the effect of costing and the general ledger (G/L) account update during the production process in Dynamics 365 Business Central.
For this specific walkthrough, please find below the G/L Account that will be used:

Step 1: Inventory Posting Setup:

Step 2: After Consumption of Raw Material:
WIP Account is Debited (increase) and Inventory Account is Credited (decrease).

Step 3: After Posting Output:
- Capacity Entry: WIP account is Debited (increase) and Direct Cost Applied Account is Credited (decrease).
- Finished Goods: Interim Inventory Account is Debited (increase) and WIP account is credited (decrease).

Step 4: After Order is Finished:

Step 5: G/L Account Updates After Reviewing the G/L Account:
- Finish Good Inventory account is Debited (increase) and Interim Inventory Account is Credited (decrease).
- At the same time, WIP account is cleared.

For any other Microsoft Dynamics 365 inquires, contact support@BondConsultingServices.com

Electrical Power Equipment Manufacturers’ Sales Representative Leverages Dynamics 365 to Streamline Its Sales Process and Optimize Value-Add to Customers
Headquartered in Ridgefield, Washington, Peak Measure has been delivering premium electrical apparatus and equipment products and services to the electrical power industry in several states in the Western US for over four decades. As a Sales Representative for multiple electrical and power equipment manufacturers, Peak Measure provides best-in-class products to customers to increase the value and reliability of their operations including fault indicators and sensors, protection and precision timing, transformers, HV Circuit breakers, cabling, and systems with intelligence. The Peak Measure Team consists of knowledgeable and dedicated professionals who help manufacturers to deliver their products and services throughout Alaska, Idaho, Hawaii, Montana, Oregon, Utah, and Washington. Peak Measure’s goal is to optimize the efficiency, effectiveness, safety and reliability of customers’ electrical power solutions.
Peak Measure partnered with Bond Consulting Services (BCS) to implement a solution that would support their mission for their customers. BCS quickly got to work on customizing and deploying Dynamics 365 Sales, Microsoft’s premier cloud-based CRM solution, to build a comprehensive process flow to better track Peak Measure’s sales opportunities, from initial customer contact through to the generation of an order. The BCS Team configured the Dynamics 365 Sales environment with Exchange Online and SharePoint Online integration, along with a Sales Workflow and Business Process Flow to help their customer service team navigate new opportunities and close deals faster. The BCS Team worked closely with Peak Measure to design an effective solution including custom fields, charts, reports, and a 4-panel dashboard in Dynamics 365 Sales to meet the company’s unique business needs. BCS also provided Peak Measure with Dynamics 365 Sales licensing including Dynamics 365 Sales Professional licenses for 11 users.
The Peak Measure Team is thrilled with their new CRM environment and has been using it for the last several months to streamline their sales operations. BCS continues to provide ongoing configuration consulting and support services to Peak Measure to ensure they are getting the most out of their Dynamics 365 Sales solution.
To learn more about how Microsoft CRM can automate your key business processes, please reach out to the BCS Team at sales@BondConsultingServices.com or schedule a free consultation! To read more BCS Success Stories, check out our website!

Automated Production Scheduling Using Dynamics 365 Business Central
When it comes to manufacturing goods, scheduling plays a critical role. There is no shortage of scheduling strategies, software, and techniques manufacturers and job shops employ to get the job done. Manufacturers are plagued by unexpected events like machine downtime, staff shortages, unexpected orders, and other variables to complicate scheduling further.
Large manufacturers, for example, auto manufacturers, invest millions into staff and software to manage production. Unfortunately, these systems are beyond the grasp of job shops and smaller manufacturers, well, until now.
Dynamics 365 Business Central is a comprehensive business management solution for small and medium-sized manufacturers. Business Central provides a platform to help manage the manufacturing process. Bond Consulting Services (BCS) are experts in helping companies implement, manage and extend Dynamics 365 Business Central.
One of BCS’ leading partners, Insight Works, created the MxAPS app which extends with Dynamics 365 Business Central to build finite capacity schedules quickly with a button click.

Before we dive into some of the details of Business Central and MxAPS, let’s first look at some basic scheduling strategies.
Forward Versus Backward Scheduling
Backward scheduling is based on knowing the due date or required-by-date of an order and then backing off the lead time or processing time to determine when production needs to start.
Advantages of backward scheduling:
- Easy to schedule. Building schedules working backward from the due date is relatively simple as it is more structured and organized.
- Lower costs. Raw materials and inventory don’t have to sit on shelves waiting to be consumed; instead, materials can be brought in-house when production is to start.
Disadvantages of backward scheduling:
- Production resources (machines and labor) may sit idle. If an order is due to ship in 10 days and only requires four days of production, there are six days before production will begin. During these six days, there may be resources available that can be put to use. Using available resources today then makes them available later for additional capacity.
- There is no buffer room for unforeseen events. Backward scheduling does not consider machine breakdowns, sick staff, or other issues, so deadlines can easily be missed when problems arise.
- Additional orders can be difficult to schedule. Because backward scheduling is based solely on a due date and a lead time or average processing time, scheduling can become a nightmare when there is an influx of orders.
- The day to begin production may be in the past. In some cases, an order may come in, and its due date would have required production to begin two weeks in the past.
On the other hand, forward scheduling is production planning based on when resources are available to determine the shipping or due date. Forward scheduling will tell you when and how to manufacturer something based on the resources available today.
Advantages of forward scheduling:
- Fill orders quickly and over-deliver. Forward scheduling maximizes resource utilization; as such, orders can often be delivered sooner when compared to backward scheduling.
- Increased resource utilization. Forward scheduling looks to maximize the production resources available today. Idle people and equipment are minimized.
Disadvantages of forward scheduling:
- Scheduling can become complicated. Forward scheduling can be challenging, especially when done manually. Shifting deadlines, unexpected orders, machine break down, and other variables can complicate things.
Finite Versus Infinite Capacity Scheduling
Infinite capacity scheduling is based on average times which disregard the capacity capabilities of manufacturing resources, like machines and people. Infinite capacity scheduling will often lead to a messy, unrealistic schedule because machine and staff shortages will occur, especially as order volumes increase.
Finite capacity scheduling takes into account the available capacity of manufacturing resources when scheduling jobs. For example, finite scheduling will know the cycle time capabilities of an injection molding machine. It will also know what setup time is required for each job. Finite capacity scheduling produces an executable schedule based on the actual loads on the equipment..
So, What is the Best Scheduling Strategy?
Backward or forward scheduling? Infinite or finite? What’s best? The answer is: it depends. It depends on what is being manufactured, how complex or straightforward the manufacturing process is, how flexible your schedule needs to be, among other variables.
Dynamics 365 Business Central provides a flexible path with many options for many small to medium manufacturers.
What Can Job Shops and Manufacturers Expect from Business Central?
Dynamics 365 Business Central provides a good platform for manufacturers to manage their operations. Business Central manufacturing features including:
- Production Bill of Materials
- Routing Management
- Production Orders
- Production Reporting
- Basic Supply Planning
- Demand Forecasting
- Sales and Inventory Forecasting
- High Level Capacity Planning
- Infinite and Finite Loading
- Warehouse Management
- Agile Manufacturing
The Role of a Production Planner Using Business Central
Where Business Central falls short is in the actual creation of the detailed production schedule. The tools Business Central provides enables planners to have insight into orders, machine centers, resources, inventory, and other parameters, but it’s up to the production planner to make the schedule.
When an unexpected event occurs, the production planner needs to adapt the production schedule accordingly. Unexpected events include:
- Machine breakdown
- Staff shortage
- Inaccurate inventory
- New orders with tight deadlines
- Rework
As good as a production planner is, scheduling is a constant battle to stay on top of changes while balancing between maximizing utilization rates and customer satisfaction (in other words, meeting deadlines with quality products).
Supercharging Business Central with MxAPS from Insight Works
MxAPS is an app from Insight Works that seamlessly integrates with Dynamics 365 Business Central. MxAPS is an advanced finite capacity scheduling tool that transforms production planning and scheduling from an inaccurate and time-consuming task into a responsive, repeatable, and highly accurate decision support activity.
MxAPS picks up where Business Central leaves off. MxAPS dynamically generates production schedules to optimize resource utilization and deliver manufactured goods on time. It creates realistic schedules that you can actually use on the shop floor and execute.
Here are a few benefits when using MxAPS with Business Central:
Automatic Machine Center Selection
Business Central uses the concept of Work centers which are made up of one or more Machine centers. A Machine center may be a packing table, powder coating booth, CNC milling machine, welding station, or something else.
When it comes time to schedule production orders, Business Central with MxAPS will automatically schedule the most appropriate Machine centers using finite capacity scheduling. The schedule ensures work is spread over the most suitable machines and completion time is optimized.
If the ideal Machine center is not available, an alternate Machine center will be used all in an effort to optimize production. In some cases, a Machine center may be defined as a subcontracted service. Sometimes subcontracting work is a better alternative to missing deadlines.
Production Sequence
MxAPS for Business Central enables users to define custom sequencing rules and enable other techniques to optimize production. For example, manufacturing lighter colored goods first and moving onto darker items can save cleaning time and machine preparation.
Another example is a large order that could tie up machines for an extended period, making them unavailable for other production orders. In these cases, large orders can be split into individual lots of fewer quantities or split across multiple machines or split across multiple days or any other rule that has been defined.
Manage the Unexpected
If a piece of equipment goes down or a tradesperson becomes ill and is not available, a manually managed schedule quickly becomes a daunting task to update in an attempt to reassign resources and determine impacted orders. With MxAPS for Business Central, the unavailable resource is identified as such within Business Central, and a revised production schedule is generated automatically.
Close the Loop With the Shop Floor
MxAPS for Business Central can integrate with manufacturing execution systems, such as Insight Works Shop Floor Insight, for paperless schedule dispatching and real time production reporting. When a new schedule is generated MxAPS is able to lock production orders that were reported in process on the machine centers they were reported on and update the remaining quantity and time scheduled. Use this data to track schedule compliance and evaluate routing times against actual times to improve future schedule accuracy or identify underperforming machines or assets.
Optimize Equipment Maintenance
MxAPS for Business Central helps optimize equipment maintenance schedules. Depending on maintenance requirements, equipment can be taken out of circulation every X number of days for maintenance, and the production schedule will reflect this. Maintenance can be hour-based too where equipment is only taken offline for maintenance when it has reached X number of hours of run time.
Schedule Non-Production Activities
Often during the production process, there is time taken up by non-production activities. For example, non-productive activities may include the time to cool parts after going through the powder coating ovens or transporting parts from one location to another. MxAPS for Business Central provides a lot of flexibility when it comes to defining non-production activities.
Optimize Your Shipping and Receiving Schedule
Some manufacturers have extended MxAPS for Business Central to their shipping process. For example, maybe you only have five shipping and receiving bays with a lot of material moving in and out daily. Shipping bays can be defined as a finite machine resource and included in the production schedule. By doing so, manufacturers can optimize their just-in-time schedules and reduce their inventory levels.
Consider Changeover in your Production Schedule
Machine centers within Business Central have setup values. Take injection molding equipment as an example. The equipment may require several setup steps, including swapping dies, color change, tooling change-outs, and other things. MxAPS for Business Central knows what setup is needed for a specific production order, based on the previous item on the machine center, and can sequence or group production orders to reduce changeover. For example, maybe three production orders are producing white parts and use the same tooling. The only change is the die. These would be sequenced or grouped to avoid additional time for tooling and color changes.
Manage Advanced Constraints
There may be enough equipment to complete a production order quickly; however, there is limited staff available to operate the equipment. In this scenario, MxAPS for Business Central will decide which machines to run based on the available labor. For example, you have six machines, but only enough labor to run three machines. In this case, MxAPS for Business Central will constrain the schedule to only run three machines.
No More Tribal Knowledge
As mentioned earlier, implementing an automated scheduling system is often outside the means of small and medium-sized manufacturers. The more common approach is to have one or two genius people who thoroughly understand all production-related variables, then build the production schedules. Training new people, replacing existing highly knowledgeable people, or dealing with times when these “geniuses” are unavailable can be challenging.
Even if production planners were readily available, with today’s technology, it isn’t necessary to have planners working day in and day out rearranging tasks on a Gantt chart.
We said it earlier, and we’ll repeat it: MxAPS for Business Central is an advanced finite capacity scheduling tool that transforms production planning and scheduling from an inaccurate and time-consuming task into a responsive, repeatable, and highly accurate decision support activity.
As orders from customers are received, they are entered into Business Central, and from there, a production schedule is generated. MxAPS automatically creates production schedules based on time. For example, if you operate with two eight-hour shifts, MxAPS will create a production schedule before the start of each shift – literally in a matter of seconds.
Getting Started with MxAPS for Business Central
MxAPS for Business Central is designed specifically for Microsoft Dynamics 365 Business Central. Deploying Business Central is simple and quick; however, the effort needed to configure Business Central will vary depending on the complexity of your operation. Choosing the right Microsoft Partner will ensure Business Central works well for you.
With Business Central in place, MxAPS can be installed either from the Microsoft AppSource online marketplace or from the extensions marketplace from within Business Central. Basic setup requires only a few steps before users can begin generating schedules.
To learn more, reach out to the BCS Team at sales@BondConsultingServices.com, schedule a free consultation or check out the on-demand demo from Insight Works!