
Managing SSRS Security Roles in Dynamics GP
When people use SSRS for their reporting needs, many times, we get requests on how to set up or manage security roles. We have put together this quick guide detailing the steps on how to edit the security role of either an entire folder or a single report.
Within SSRS, click the Site Settings icon located in the top right-hand corner of the page.

Navigate to the Security tab and click New Role Assignment.

Enter the Group Name or User name in the following format “Domain\username or group name.” Then, click, OK.

Navigate to the SSRS Report or SSRS Folder, which needs its security role changed.
Hover over the report with the cursor and click the yellow arrow to the right of the report name or if you would like to apply the same security settings for all reports within a folder, click the folder settings icon (skip to step 7 if changing the security role for the entire folder).


Click Manage.

Navigate to the Security tab and click Edit Item Security.

Click OK.

Enter the Group Name or User name in the following format “Domain\username or group name” of who/whom should be granted access. Also, make sure to select the desired security role from the option set below. Then, click, OK.


Configuring Data Source Settings within Jet Reports
Please follow the steps below to set up a new data source within Excel Jet Reports in Business Central. Setting up the data source will allow the user to use their company’s information within the reports.
Open Excel.
Click the Jet Tab.
Click the Data Source Settings icon.

Click the “+” icon to create a new source.

A new window will prompt you to create a name for the source and identify the Database type.

The sign-in screen will appear where you will sign in using your credentials for the environment selected.

Once signed in, you will get the following window. Click Ok, and everything should be all set with creating your data source which will now allow you to begin using your data within Jet Reports.

Reach out to us for any other Microsoft Dynamics 365 inquires – support@BondConsultingServices.com

Create Budget from Historical GL Balances in Business Central
Article by: Carlos Lozano – Microsoft Dynamics 365 Business Central Consultant
Creating a budget manually or from an Excel import file can be cumbersome, luckily there are a few excellent hidden features that allow you to quickly create a budget based on actual entries from the previous year and use that as the starting point for your budgets going forward.
Steps to Create a Budget from History:
Use the Alt+Q (Tell Me search tool) to search for G/L Budgets and select it from the list.

Select +New to create a new G/L Budget. Then, enter a Budget Name, on Show as Lines enter G/L Account, and complete the other options. Add or remove filters as need.

Select Balance under Budget Matrix and G/L Account Balance/Budget.
- On the G/L Account Balance/Budget window, select Actions > Functions > Create Budget > From History…
- On History Beginning Date enter the first day of your prior fiscal or calendar year.
- On Budget Beginning Date enter the first day of the new budget year.
- On of Periods, enter the number of periods for the Budget.
- On Period Length select the Length of each Period.
- On Percent Change specify if you want the Budget to increase in relation to the corresponding historical period.
- On Round To specify the nearest value you want the Budget to be rounded to.
- On Income/Balance, select if you want to create the Budget for Income Statement or Balance Sheet or both.
- On enter a G/L Account to create a budget for one account or clear value to create it for all accounts.
- On Filter totals by, specify any required filter, for example, Customer Group Small, if the Budget needs to be different for Dimension Customer Group.
- Click OK to create the Budget.

Review the newly created Budget and make adjustments if necessary.

For adjustments, on the main Budget screen, select Budget > Export to Excel, make adjustments and click on Budget > Import from Excel to replace or add entries.

Now you can see actual entries for the new Budget with this useful, neat feature in Dynamics 365 Business Central.

Why Choose Bond Consulting Services to Implement your Microsoft Dynamics ERP
Bond Consulting Services is a Microsoft Gold Partner. For the uninitiated, that’s the highest level that a Microsoft Dynamics Partner can achieve. But that status probably doesn’t tell you everything you need to know, so…
Allow me to tell you more about Bond
Bond Consulting Services is a national consulting firm that empowers organizations across the United States to thrive in a digitally transformed world. We are a Certified Microsoft Partner and one of Microsoft’s Top 200 Partners in the United States.
Our consultants have more than 100 years of combined business-software experience and industry knowledge to help your business achieve more. With more than 17 years of industry experience, we are confident in our ability to deliver on the solutions we provide and proud of our extensive expertise and unparalleled understanding of Microsoft’s suite of products and how they work together.
Our team members have backgrounds and expertise in business and management, from former CFOs, CIOs, and Controllers, to other executive positions. We specialize in Consumer Product Goods Distribution, Food and Beverage Manufacturing; Hospitality; Professional and Financial Services; and Recycling.
We pride ourselves on adding exceptional value to our customers by delivering outstanding customer experiences and providing proactive relationship management through our award-winning relationships with Microsoft, solution partners, and industry associations, such as the International Association of Microsoft Partners (IAMCP).
And there’s more
Choose Bond due to our track record of successful implementations and our ability to provide proactive technology training and provisioning. Choose Bond because of our licensing expertise and our ability to offer product discounts that are unique to our partnership with Microsoft. Choose Bond because we provide superior, comprehensive technical support to help you prevent and solve IT problems before they affect your business.
Depth and Breadth
Just take a look at what we offer. Office 365, Power BI, Worklogic EPS, Microsoft Dynamics 365, Microsoft Dynamics GP, Microsoft Dynamics 365 Business Central, and Dynamics 365 for Sales, Customer Service, Field Service, Project Service Automation, Marketing, Retail, and Talent.
Take the Next Step
Contact us to learn more about Microsoft Dynamics ERP and CRM. Visit us at www.BondConsultingServices.com or just pick up the phone and call 562-988-3451.
Related Post:
Digital Transformation Is a Journey: 4 Ways to Reach the Finish Line with Microsoft Software

Creating a New User in Business Central
Article by: Eduardo Haro – Business Analyst
To add a new user in Microsoft Dynamics 365 Business Central, your company’s Office 365 administrator must first create the new user in the admin center. The instructions below will highlight how to complete this task.
Navigate to your company’s Microsoft 365 Admin Center.
- Note: Only Global Administrators will be able to create new users here.
Click the Users icon and select Active Users.

Then, click the Add a User icon.

This will prompt the new user creation window. Please fill in the information and appropriate licenses accordingly. Once all the information and appropriate licenses have been assigned, click Add to add the user.

Next, navigate and login to your Dynamics 365 Business Central Environment.
Click the lightbulb icon to open up the search.

Type Users within the search and click the Users link outlined below.

Within the Users window, click the Process tab. Then, select the Get Users from Office 365 icon. That should bring across any new users. This will bring across any user with a Dynamics 365 Business Central license who is not already in the system.
- Note: There is a grayed out “+ New” icon. That icon does not have the capability to create new users within Business Central because the user must first be assigned a license. Users must first be created within the admin center, assigned the Dynamics 365 Business Central license if they don’t already have it, and then added to Business Central by executing the Get Users from Office 365 function.


Year End Process in Business Central
Article by: Lupe Haro – Microsoft Dynamics ERP Consultant
To make the year-end process smoother, we have provided the following information on how you can run the year-end close process within Dynamics 365 Business Central.
Accounting Periods
To be able to run the year-end close process you must first close the year within the accounting periods window.
Closing Accounting Period
Choose the light bulb icon, enter Accounting Periods and choose the highlighted link.

In the Accounting Periods window select Process > Close Year

Click Yes on the warning

(NOTE: Although the year has been closed, this does not restrict users from posting to a prior year. Users will still be able to post to a past year if they are allowed to within the General Ledger Setup or User setup Posting to and from fields.)
The accounting periods for the marked year will now show as “CLOSED”

Creating a new Accounting Period Year
This step is optional if the new accounting year has not been setup. If it has already been set up, please skip this section.
In the Accounting Periods window select Process,> Create Year

In the Edit – Create fiscal year window, enter the new year’s starting date, number of periods, and period length.

Click Ok to create the year

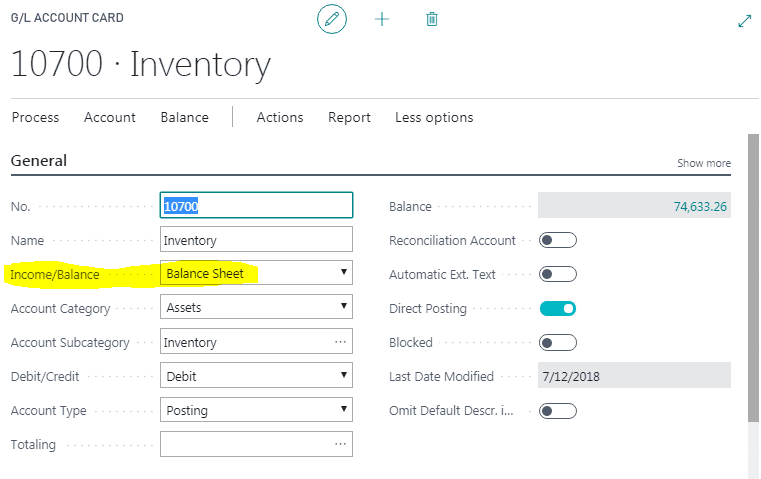
Chart of Accounts
Before continuing the year-end process, it is important that you check the “Income/Balance” field in all your accounts to confirm they are set up correctly. The close income statement process will determine which accounts will roll up to retained earnings (Income Statement accounts) and which accounts’ balances will roll over to the new year (Balance Sheet accounts).
Close Income Statement
Choose the light bulb icon, enter Close Income Statement and choose the highlighted link.

In the Edit – Close Income Statement window, populate the fields as follows
- Fiscal Year Ending Date: Will populate with the last date of the closing year.
- Gen Journal Template: GENERAL
- Gen Journal batch: You can select an existing batch or create a new batch.
- Document No.: Will populate automatically with the next document no.
- Retained Earnings Acc.: Enter your retained earnings account
- Posting Description: Default message is “Close Income Statement” but can be changed if needed.

In the Close By section:

- Business unit code – Mark this option if you are running the close in a consolidation company and want to close by the business unit (company).
- Dimensions – If dimensions are used, click on the “….” to select the dimension codes that you would like to close by. This will create close entries for each Income Statement GL account by dimension.

- Inventory Period Closed – mark this option if you want the inventory periods within the fiscal year ending date to be closed when running this process.
Click Ok. Business Central will then start the creation of the closing journal entries in the batch listed in the Edit – Close Income Statement window.
Post Closing General Journal Batch
Under the Finance menu select General Journals or choose the icon and enter General Journals.

Select the batch that you entered in the Edit – Close Income Statement window.

Closing entries will be marked with a “C” in front of the date. You can then review the transactions and confirm all is correct.
When ready to post click on Process > Post.


How-To Troubleshoot a Positive Pay Export Error in Business Central
Positive Pay Exports are used by banks to match checks issued by companies. The bank confirms that the check(s) are listed on the Positive Pay file before confirming the transaction.
Positive Pay definitions are done using Data Exchange Definitions and are linked to a bank using a Bank Import/Export Setup file. Most banks will give you specifications on how to create the file layout to make sure that the records are imported correctly into their banking software.
Generally, voided and financially voided checks are exported into the Positive Pay file, but occasionally a few entries with Check Amount = 0 make it to the list. The following error might be seen while running the Positive Pay Export from the Bank Card:
“Amount must have a value in Positive Pay Detail: Data Exch Entry No.=XX, Entry No.=YY. It cannot be zero or empty.”
The issue seems to occur when a single check is issued for multiple payments and the lines to print on the stubs are not enough. The subsequent printed pages will show as VOID with an amount of 0. The Positive Pay Export fails because a check cannot have a zero amount.
To fix the error –
- Open Data Exchange Definitions
- Locate the Data Exchange Definition record
- Under the “Line Definitions” grid
- Select the Detail Line Type
- Click on Manage > Field Mapping
- Check the Optional box for the Column No. that contains the check amount.

- Return to the Bank Card and retry the export.
After completing these steps, the error will be fixed.

What’s so Great about Great Plains aka Microsoft Dynamics GP
Maybe Microsoft Dynamics GP, which many of you remember as Great Plains, is not quite as spectacular as the Great Wall of China. But Dynamics GP is still pretty darn great. Here’s why.
Microsoft Dynamics GP is a complete mid-market Enterprise Resource Planning (ERP) solution that can be hosted in the cloud or on your own on-premises server. Trusted by more than 50,000 companies, Dynamics GP is secure and scalable, combining years of innovation and the agility needed to compete in today's market.
With Microsoft Dynamics GP, you can manage your business, from financials to inventory and operations, on any device, from anywhere, at any time. Dynamics GP provides the business intelligence you need for real-time reporting and smart decision making. It also includes applications for payroll and human resources, as well as sales and service.
And still, there’s more great stuff.
Introducing GP Plus by Bond Consulting Services!
We have developed six auxiliary apps and services to extend the functionality and enhance the user experience of Microsoft Dynamics GP.
- Dynamics GP + Manufacturing - Extend Dynamics GP with Microsoft's Manufacturing module or Horizon International's manufacturing and quality control add-ons to meet your process or discrete manufacturing needs. Learn more
- Dynamics GP + Your Application - With tools like SmartConnect by eOne Solutions, Integration Manager, Server Based Architecture, Scribe, and many others, you can integrate Dynamics GP with the apps you’ve chosen for capabilities such as eCommerce and POS. Learn more
- Dynamics GP + Avalara - Sales tax is hard. AvaTax makes it easy for you. Avalara, the creator of AvaTax, offers the most complete end-to-end sales tax compliance solutions available for Microsoft Dynamics GP. Learn more
- Dynamics GP + SalesPad - Enhance your sales and customer service team's experience and features by adding SalesPad to your existing implementation of Dynamics GP. Learn more
- Dynamics GP + Awingu - Awingu makes it easy for you to access Dynamics GP on any device and any browser through its simple web-based interface. Watch the video
- Dynamics GP + Azure – You can leverage Microsoft's leading cloud service to host Dynamics GP, backup GP, or to enable a hybrid environment. Contact us to learn more
Are you ready to achieve greatness?
If you’re ready, so are we. Visit us at www.BondConsultingServices.com or just pick up the phone and call 562-988-3451.
Related Post
You Should Choose Microsoft Dynamics GP Because

Are Millennials Replacing Baby Boomers in Your Workforce? Give Them Software They’ll Love!
It’s a fact of life. Boomers are aging and leaving the workforce. And while we’ve heard a lot about millennials – who they are and what they’re like as people and as employees – it’s not just millennials (also known as Gen Y) who are replacing Boomers.

Gen Xers have long been in the workforce, and Gen Zers are entering, too. What we can generalize about all of the generations that have succeeded the Baby Boomers is this: Each generation is more tech-savvy than the last. And as such, given the right tools, they have the skills to contribute to your company’s digital transformation.
Give Them Software They’ll Love!
We can’t expect these new generations to be happy and productive if they’re working with outdated software (or obsolete hardware for that matter). That would be equivalent to asking them to contribute to the growth and profitability of your company with one arm tied behind their backs.
But give them state-of-the-art Microsoft Dynamics ERP and CRM software, and they’ll likely exceed your expectations. What’s so special about Microsoft Dynamics? It incorporates everything that your tech-savvy employees could ask for:
- Mobility
- Anytime, anywhere access
- Full integration
- Cloud-native
- Unified platform for financials, sales, service, and operations
- Automation that eliminates manual, repetitive (mind-numbing) tasks
- Modern user interface (UI)
- Intuitive navigation
- AI-based insights
- Satisfying user experience (UX)
And the list goes on and on.
Take the Next Step
If you’re ready to keep your Gen X, Gen Y, and Gen Z staff members happy and motivated, so that they stick with you for the long term, contact us to learn more about Microsoft Dynamics ERP and CRM. Visit us at www.BondConsultingServices.com or pick up the phone and call 562-988-3451.
Related Post:
Digital Transformation Is a Journey: 4 Ways to Reach the Finish Line with Microsoft Software

How Microsoft Dynamics 365 Delivers CRM - Part 3: Customer Service
In the business community, CRM is well known. It stands for Customer Relationship Management. But in some circles, it has become known as CE, which stands for Customer Engagement. Regardless of what you call it, the concept includes three main components: Sales, Marketing, and Customer Service.
In this last part of a 3-part blog series, brought to you by Bond Consulting Services (BCS), we’re going to look at how Microsoft Dynamics 365 delivers CRM for customer service.
What Is Dynamics 365 for Customer Service?
As part of Microsoft's premier cloud-based CRM solution, Dynamics 365 for Customer Service state-of-the-art customer service management software powered by Microsoft. It’s software that provides companies of all sizes the ability to empower their customer service team and delight their customers with Microsoft's end-to-end service and support management functionality.
What Does Dynamics 365 for Customer Service Deliver
Customer satisfaction is the new coin of the realm. In order to deliver the level of service that today’s customers expect and demand, you need software that helps your service team respond in a timely, efficient, and knowledgeable manner. That’s why Microsoft Dynamics 365 for Customer Service includes:
- Support ticket tracking - To track and manage customer support tickets generated via email, phone, or web.
- Support process flow - To move tickets across configurable process flows, track their progress, and gain valuable insight.
- Knowledgebase - Use an internal knowledge base wiki to provided templated and automated email responses to customer inquiries.
- Customization - This enterprise-grade software can be customized to meet your specific customer service team needs.
- Self-service portal - Utilize Microsoft's customer service portal that allows customers to submit and manage their own support tickets.
- Dashboards and reports - Create interactive dashboards that provide day to day insight on support trends, activities, and social media interaction.
Dynamics 365 for Customer Service Drives Results
Once you’ve implemented Dynamics 365 for Customer Services, you can expect to see increased brand loyalty and advocacy by providing personalized and contextual interactions across the customer journey, through any channel, and from any device. You’ll have the ability to empower your agents by providing them with everything they need to deliver a more personalized, effective standard of service – using tools that are at their fingertips, from a single application. And you’ll have the agility to make adjustments in real-time through actionable insights that anticipate the rapidly changing needs of customers and your brand.
Take the next step
Contact us for more details. Visit us at www.BondConsultingServices.com or just pick up the phone and call 562-988-3451.
Related Posts:
How Microsoft Dynamics 365 Delivers CRM - Part 1: Sales
How Microsoft Dynamics 365 Delivers CRM – Part 2: Marketing