
Reprinting Bank Reconciliation Reports in Dynamics GP
Our clients often inquire about accessing bank reconciliation reports post-reconciliation. The challenge arises when hard copies of these reports are misplaced or lost. It is possible to regenerate the 4 bank reconciliation reports by following this path:
Reports -> Financial -> Bank Posting Journals


From there you can select the reports you need to reprint:
- Reconciliation Journal: Select this option to reprint the Reconciliation Posting Journal, which is a summary of all activities for the selected period.
- Bank Adjustments Journal: Select this option to reprint the Bank Adjustments Posting Journal, which will contain a list of the adjustments entered within the bank reconciliation window.
- Cleared Transactions Journal: Select this option to reprint the Cleared Transactions Posting Journal, which contains all items that matched the bank statement.
- Outstanding Transactions Report: Select this option to reprint a list of transactions that did not clear the bank reconciliation this month.
Select one of the existing options (or click on the ‘New’ button to create a new report option), then click on the ‘Modify’ button.

For these reports, you will be required to have the Audit Trail Code to enter in the range fields of the report. The Audit Trail codes are listed in order, so usually the last bank reconciliation audit trails on the list will be the most recently posted reconciliations.
If you are looking for an older reconciliation, that process gets a bit more complicated as there are no indications of what checkbook or period you are pulling. To get a bit more insight I’ll typically have a SmartList setup to help identify the specific reconciliation/ audit trail code to be tracked down; let us know if you need a SmartList setup to aid in your research.

Once you have inserted your search criteria, you can click on Destination to set where you would like the report generated, then click on the Print button along the Action Pane to generate the report immediately; you will need to cycle through the same process for all of the bank reconciliation posting journals you would like to reprint. Be sure to save your report options in order to expedite your search next time around.
For more information or questions about Dynamics GP please reach out to us at Sales@BondConsultingServices.com or you can click here to schedule a free consultation with one of our Dynamics expert consultants. Alternatively, you can always visit our YouTube channel for helpful product videos and recorded webinars.

Dynamics 365 Business Central | Copying Fields with Simple Object Designer
Our previous article on Simple Object Designer (SOD) as developed by Erik Hougaard, describes an overview of SOD's intuitive user interface for completely customizing Microsoft Dynamics 365 Business Central.
SOD allows the end user to add fields to screens, reports, and other objects without using Microsoft Application Language (AL) programming.
As expressed in those articles, instead of using AL for Business Central, simply rely on SOD.
Here, we’ll study SOD’s ability to copy fields from one screen to another. Doing so calls for using SOD FlowFields.
Copying Unit Price
Business Central’s “Sales Prices” screen creates specialized pricing in Business Central, and this screen includes the “Unit Price” field:

Users allowed access to Item Card but not Sales Prices may want to see the devised “Unit Price” field displayed on Item Card, especially when pricing can change on a dime.
By using SOD FlowFields, Unit Price is copied onto the face of the “Item Card” screen as Unit_Price:

Choosing Create new fields on existing tables in the SOD screen allows us to add fields:

After creating our new “Unit_Price” field, we’ll click Placed on pages as seen on the right-hand side of the “Create Fields” screen. This places the field after the “Profit %” field on Item Card:


Returning to Create Fields, we’ll click the “Field Settings” button:

Next, in addition to selecting FlowField within the “Type” drop-down list, we’ll update the sections called FlowField and FlowField Filters:

In FlowField, we choose the “Sales Price” table and its “Unit Price” field.
The one row in FlowField Filters simply shows that we have joined to the Sales Price table based on the “No.” field (i.e., the “Item Number” field).
Going back to SOD’s main screen and clicking ![]() and the “Yes” button allows us to see Unit_Price on the “Item Card” screen:
and the “Yes” button allows us to see Unit_Price on the “Item Card” screen:

For more information about Simple Object Designer, please reference our other blog by clicking here. For any other questions about how to maximize your Dynamics investment, please reach out to us at Sales@BondConsultingServices.com or you can schedule a free consultation by clicking here. Alternatively, you can always visit our YouTube channel for helpful product videos and recorded webinars.

Updating Checkbooks within Dynamics GP
Even though it does not happen often, reviewing and updating your default checkbook is a crucial step in maintaining the integrity of your financial data and ensuring efficient operations within Dynamics GP. Here are a few reasons:
- Account Changes: If your primary checking account changes due to bank closures, account closures, or account number modifications, updating the default checkbook ensures that all new payments are processed correctly.
- Check Stock Management: Using an outdated default checkbook can lead to discrepancies in your check stock inventory. Updating the checkbook allows you to accurately track and manage your check supply.
- Bank Reconciliation: An incorrect default checkbook can cause issues during bank reconciliations, leading to discrepancies and potential errors in your financial statements.
- User Efficiency: By having a correct default checkbook, users can save time when creating new payments, as the system will automatically populate the correct checkbook information.
To change the default checkbooks, you can navigate to the following windows:
Within the A/P module, the path is Microsoft Dynamics GP >> Tools >> Setup >> Purchasing >> Payables.
Update the default Checkbook ID and click the ‘OK’ button within the Action Pane to close the window.

Within the Sales Order Processing module, the path is Microsoft Dynamics GP >> Tools >> Setup >> Sales >> Sales Order Processing.
Update the default Checkbook ID and click the ‘OK’ button within the Action Pane to close the window.

Within the A/R module, the path is Microsoft Dynamics GP >> Tools >> Setup >> Sales >> Receivables.
Update the default Checkbook ID and click the ‘OK’ button within the Action Pane to close the window.

Within the GL/ Financial module, the path is Microsoft Dynamics GP >> Tools >> Setup >> Financial >> Bank Reconciliation.
 Update the default Checkbook ID and click the ‘OK’ button within the Action Pane to close the window.
For more information about how to maximize your Dynamics investment, please reach out to us at Sales@BondConsultingServices.com or you can click here to schedule a free consultation with one of our Dynamics experts. We are excited to be entering our 25th year supporting Dynamics solutions, so you can trust that we have the knowledge and relevant expertise to achieve your business goals. You can always visit our YouTube channel for helpful video tutorials and product walkthroughs.

Supply Chain Shortcuts
Microsoft Dynamics 365 Business Central Worksheets represent one of the many reasons why the ERP application is relatively easy to use.
Armed with these Worksheets, you can automatically and quickly create warehouse transactions and other business records. Worksheets are shortcuts helping you achieve your supply chain management goals.
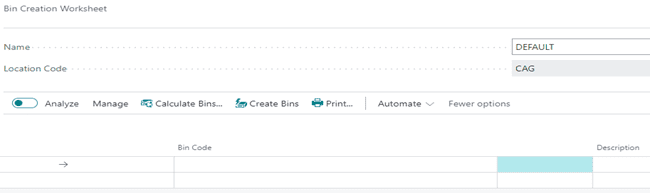
Bin Creation Worksheet
True, the creation of bin locations one at a time isn’t difficult. And, at first glance, reviewing the simple “Bin Code” and “Description” fields makes the Bin Creation Worksheet appear useless.
But, if you dig deeper, you’ll discover how useful this Worksheet actually is.
The Bin Creation Worksheet creates not just multiple bins at once. This tool, also, creates multiple bins having multiple characteristics at once.
 Use Business Central’s “Personalize” feature to add any of the following fields to the Worksheet:
- Bin Ranking,
- Bin Type Code,
- Block Movement,
- Cross-Dock Bin,
- Maximum Cubage,
- Maximum Weight,
- Special Equipment Code,
- Warehouse Class Code, and
- Zone Code.
Clicking the “Calculate Bins” button allows you to create a range of Racks, Sections, and Levels:

In the “From No.” and “To No.” fields, you must use the same letter. For example, place “A01” as the From No. and “A10” as the To No.
If you’d like to specify a character such as a dot to separate Rack, Section, and Level place the dot within Field Separator.
Select Check on Existing Bin, so that the Worksheet doesn’t try to create a bin where one already exists.
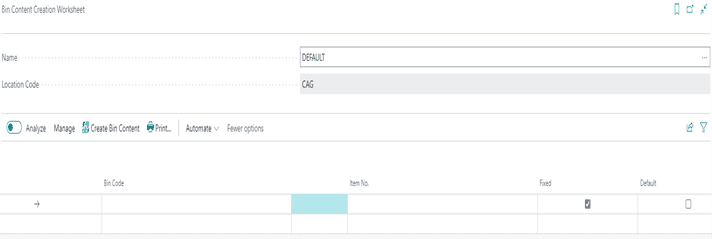
Bin Content Creation Worksheet
Marking a bin as Fixed or Default for a specific inventory item is the purpose of the Bin Content Creation Worksheet:
Use Business Central’s “Personalize” feature to add any of the following fields to the Worksheet:
- Bin Ranking,
- Bin Type Code,
- Block Movement,
- Cross-Dock Bin,
- Qty.,
- Qty.,
- Unit of Measure Code,
- Variant Code,
- Warehouse Class Code, and
- Zone Code.
Requisition Worksheet
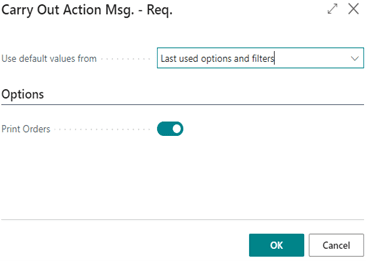
The Requisition Worksheet conducts pegging and is, therefore, an important MRP tool. When running low on materials, the Worksheet generates Purchase Orders for the quantity necessary to meet the customer demand of Sales Orders:

In addition to creating Purchase Orders in the background, the Worksheet will prompt you to print Purchase Orders:
Planning Worksheet
Business Central’s planning mechanism reviews all supply and demand data, nets the results, and creates suggestions for balancing the supply to meet the demand.
Planning ensures that demand for manufactured items found on Sales Orders is met, by advising you when Production Orders need to be generated.
The Worksheet can generate Assembly Orders, Purchase Orders, and Transfer Orders in addition to Production Orders.
So, this Worksheet processes pegging data and is an important component of both MRP and MPS.

Subcontracting Worksheet
Through the Subcontracting Worksheet, Business Central provides a handy way of generating and printing Purchase Orders when services need to be outsourced:

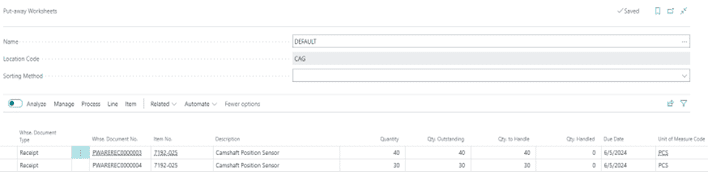
Put-away Worksheet
If your location requires both put-away and receive processing and you want to plan put-away instructions for more than one Warehouse Receipt, use the Put-away Worksheet.
Rather than having your warehouse personnel follow the instructions of a separate posted Warehouse Receipt, save time by processing multiple receipts within this one screen:
Picking Worksheet
Specialized instructions for picking inventory items for shipping products to customers are found within a warehouse order picking system called waving.
Time is money. Wave picking streamlines order fulfillment allowing the warehouse employee to quickly group items by a specific characteristic, such as shipping priority, zone, bin, or carrier.
For example, waving can be conducted through batch picking close to the time of carrier departure.
In another example, promotions may spike demand for a few items. These items can then be lumped within a wave to ensure picking efficiency.
Multiple orders are housed within small groups, or waves. The warehouse employee will, therefore, pick all orders within the wave in one pass using a consolidated picking list.
Using such a picking list the warehouse employee does not have to walk back and forth but, rather, accomplishes picking within one single trip. Warehouse productivity then increases and products are shipped on time.
Waving is accomplished by using the Pick Worksheet and making pick selections by line item:


Configuring Dataverse Search in Dynamics 365 Customer Engagement
For any organization utilizing Dynamics 365 applications, empowering users with efficient and accurate search capabilities is crucial. Fortunately, Microsoft's Dataverse Search functionality delivers a powerful solution for enhancing the search experience within Power Apps.
Dataverse Search empowers users to locate critical information across the entire integrated database quickly and efficiently. This translates to a significant improvement in information accessibility, streamlining workflows and boosting productivity across your organization.
Check out this example in Dynamics 365 Sales:


While Dataverse Search delivers comprehensive results by default, it also offers significant customization capabilities to tailor the search experience to your organization's specific needs. Administrators can define which tables and columns are searchable, ensuring only relevant information surfaces in search results.

Additionally, filters can be applied to limit results based on criteria like creation date, with other facets empowering users to further refine their search using additional attributes. This level of control ensures Dataverse Search delivers the most relevant and actionable information to your team.
Initiating Dataverse Search within your Dynamics 365 environment requires enabling the feature in the Power Platform admin center. This process involves navigating to the Settings section for your chosen environment, selecting "Product" followed by "Features." Under the "Search" category, locate "Dataverse search" and toggle it to "On." Following this simple activation and a potential indexing period, your users will gain access to the comprehensive search functionality within their model-driven apps.

For more information about how Dynamics 365 Customer Engagement can help your business, please reach out to us at Sales@BondConsultingServices.com or you can click here to schedule a free consultation with one of our Dynamics specialists. Alternatively, you can always check out our YouTube channel for helpful product videos and recorded webinar walkthroughs.

Microsoft Power BI | New Look
Microsoft Power BI is the best analytics tool on the market. With the use of Power BI, Microsoft has placed the ability to develop complex reports in the hands of the lay user.
A cornerstone of this application is its ease of use. Power BI’s “drag and drop” interface and other instruments allow for the user to create analytical reporting in only a few minutes.
Within the past year, Microsoft has gone the extra mile in making this business tool even easier to use. This is all thanks to the additions made to the Power BI Desktop interface.
The “Customize” Pane

Developers are of course familiar with the Desktop’s “Filters”, “Build”, and “Data” panes. Clicking ![]() offers the “Customize” Pane.
offers the “Customize” Pane.
The “Add or remove panes” section provides quick access to Data, Build, Format, Copilot, Bookmarks, Selection, Performance analyzer, and Sync slicers:

Data, Build, and Format are enabled, in this instance of Desktop.
New Shortcuts
The objects on the Power BI canvas contain two new shortcuts – Suggest a visual and Add to your visual.
Suggest a Visual
Based on the fields that you have placed on the Canvas, Power BI makes intelligent suggestions as to which Visualization should be used.
In addition, selecting Arrange data for me enables Power BI to provide proper placement of these fields into each axis.

Also, each of the bottom two buttons displays Small multiples and Tooltips.
Add to Your Visual
In this stacked column chart Title, Zoom slider, Ribbons, and Data labels are available for the Power BI developer:

Small Multiples
The “Small multiples” feature splits a visual into multiple versions of itself. Using a chosen dimension, the versions appear side by side with data divided across these versions. Here, the aggregated amount of revenue displays based on the day of the week:

Tooltips
The “Tooltips” feature shows additional data, when the user hovers over a column in the Visualization:

Zoom Slider
The zoom slider allows the user to zoom in on any part of the data. The axis will automatically scale to the user’s selection: 
Ribbons
Ribbons gives an expanded view of the data, by showing the amount of change between values. This example’s Tooltip shows not just the amount of revenue for Wednesday and Thursday but the difference in revenue between the two days:

Data Labels
Data labels make data interpretation easier, by showing exact amounts for each day of the week:

More Options
Clicking the “More options” button simply displays Power BI’s “Format” pane.
Easy Selection of Visualizations
No more hovering over the icon of a Visualization just to find out what it represents!
Hit the drop-down button in the “Insert” section of Power BI’s Ribbon, to find Visualizations grouped based on the purpose served:
Turning On the New Interface
To enable the features discussed in this article, navigate to File…Options and settings…Options and select Preview features on the left:
The “On-object interaction” box is unchecked, by default. Check this box.
Click OK, when prompted for a restart:
 Finally, exit the Power BI Desktop. Upon reopening, these features will be available.
For more information about Power BI or Dynamics 365 you can reach out to us at Sales@BondConsultingServices.com or you can click here to schedule a free consultation with one of our Dynamics experts. Alternatively, you can always visit our YouTube channel for helpful video walkthroughs and recorded webinars.

Creating Business Central Reports without Programming
Simple Object Designer (SOD) in Dynamics 365 Business Central provides an intuitive interface for users to customize their dashboards and reports without using Application Language. This tool creates queries for pivot tables and other reports within Business Central’s user interface.
We recently customized this report for a client:

SOD Bookmark
SOD is found by clicking the “Search” button in Business Central:

Tip: Instead of clicking the link for Simple Object Designer as shown above, select the “Bookmark” icon to the right. Doing so will place a bookmarked link for SOD on Business Central’s Role Center. Rather than searching for SOD every time that you need to create or modify a customization, simply click the bookmarked link for one-touch access to SOD!
Data Mining
Within SOD’s home screen, click Data Queries:

Clicking New in the “Query List” screen allows for the creation of the query:

Since the user wanted to utilize this sales query’s data as a basis for creating new purchase orders, we chose “Sales” as the Query Category and simply named the query “PO”.
Clicking ![]() pulls up the “Query Card” screen.
pulls up the “Query Card” screen.

After choosing the necessary tables and SQL Join Type such as LeftOuterJoin within the “Query Card” screen, selecting a table and clicking Columns allows you to choose which columns to use within the query:

Simply selecting “Yes” in Included in Query is all that’s required for displaying that column in the query.
Although choosing a Method isn’t necessary, you may do so if aggregations such as “SUM” are required.

Clicking Filters links the tables and does so, based on a common field:
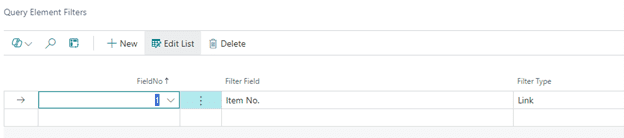
In this case, choosing Item No. as the “Filter Field” links the “Sales Line” and “Sales Price” tables.
The “Filter Field” for linking the “Sales Price” and “Item Substitution” tables is No.
This “Query Element Filters” screen, also, allows you to display only Sales Order documents from the “Sales Line” table:

Publishing and Viewing the Query
Returning to the home screen for SOD, clicking "Publish", and clicking the subsequent “Yes” button creates the query.
Once again, click Business Central’s “Search” button.
Simply type “po”, within the search field:
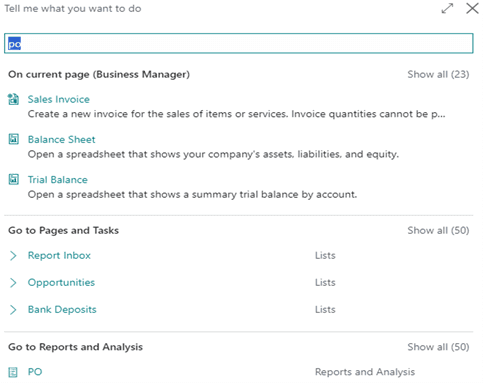
Clicking “PO” at the bottom displays our query:

Within just a few minutes, we’ve created a comprehensive query for reporting without writing a single line of code!
Creating a Business Central Pivot Table
Let’s take this a step further. Yes, this data may be exported to Microsoft Excel just like any other data in Business Central. Instead, we’ll take advantage of Business Central’s new Analysis Mode feature.
Enter Analysis Mode, by clicking the “Analyze” button ![]() found in the top left-hand corner of the “PO” query.
found in the top left-hand corner of the “PO” query.
Use Row Groups and other selections within the resulting pivot table, to group the Sales Orders based on Sell-to Customer No.:
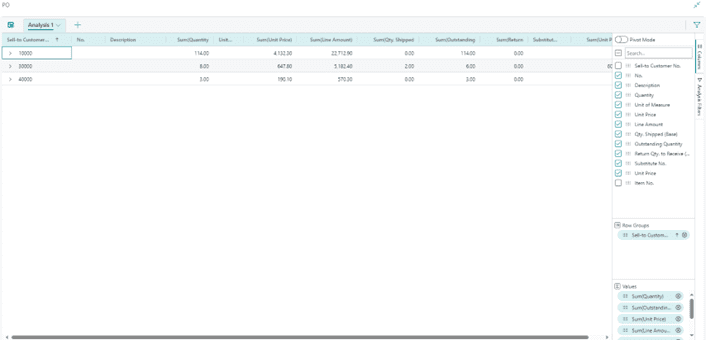
Then, you may click any of the “greater than” signs to display Sales Orders and other data for each customer:

Final Consideration
SOD should be installed and used, only within a Sandbox environment. In a Sandbox, development may be conducted without risk to Production.
Once testing is complete, SOD generates an extension (i.e., a .app file) for uploading into Production.
For more information about Simple Object Designer or about Dynamics 365 Business Central, feel free to reach out to us at Sales@BondConsultingServices.com or you can click here to schedule a free consultation with one of our Dynamics experts. Alternatively, you can always visit our YouTube channel for helpful product videos and recorded webinars.

Microsoft Bookings Empowers Teams and Drives Customer Engagement
Microsoft has completely revamped Bookings, the user-friendly appointment scheduling tool within Dynamics 365. Our team at Bond Consulting Services is excited to delve into the powerful new features in the updates, as we use Microsoft Bookings to set up important meetings with our consultants.
Microsoft Bookings offers several enhanced functionalities to improve scheduling efficiency. Bookings seamlessly integrates with your calendar, ensuring clear delineation between free and busy times when clients look to schedule appointments. This protects your privacy while offering clear availability. You can now manage both personal and shared booking pages, allowing you to cater to individual and team scheduling needs. Additionally, detailed bookings with company names and comments can be created, streamlining meeting preparation and communication.

Bookings’ granular access control allows you to manage who can access your bookings page, ensuring only authorized personnel have scheduling permissions. For managing shared booking pages, administrator permissions are required. Automated scheduling policies notify staff of appointments and assign clear meeting ownership. Bookings also offers flexible staff assignment options. You can assign meetings directly to specific staff members or allow clients to choose from your available team members based on their relative expertise. Buffer times and business hours can be set for each booking page, providing further customization for your team.
Microsoft's overhaul of Bookings isn't just about internal efficiency; it offers a significant boost to customer engagement. The ability to schedule appointments directly through a user-friendly online portal empowers clients to choose a time that works best for them, eliminating the need for lengthy email exchanges. With one link, customers have their own view of availability. Additionally, clear communication through detailed booking descriptions and confirmation emails ensures clients understand who they'll be meeting with and what to expect during the appointment. This streamlined process fosters a sense of professionalism and builds trust with your clientele. Furthermore, the option to choose from various services allows clients to find the solution that best addresses their specific needs, leading to a more personalized and satisfying customer experience.

To access Bookings for your own company is simple. Just log in to Office.com, navigate to the "Apps" section, and select Bookings (may be under “More Apps”).
For more information about Bookings or other Microsoft Dynamics products, feel free to reach out to us at Sales@BondConsultingServices.com or click here to schedule a free consultation with one of our Dynamics expert consultants. Alternatively, you can always visit our YouTube channel for helpful product videos and recorded walkthrough webinars.

Lump Sum Bank Deposit Changes in Business Central
With the release of Business Central version 24, Microsoft has made some changes when you enter a lump sum bank deposit. Previously, we were able to enter the document number on each of the line items, but now when marking the “Post as lump sum” option we receive the following message.

Business Central will now require the document number of the line items to match the bank deposit number. This unfortunately removes the ability to note the payment’s document number in each of the line items.

According to Microsoft, this change was done in order to resolve an issue when undoing a posted bank deposit and now it requires that the Document number, document type, and posting date to be the same for all line items. Microsoft is looking into providing the ability to enable a field to enter the payment number, but in the meantime the recommendation will be to use the Description field to enter the payment number.

This way you can have visibility of the check number in the Customer Ledger entries although the document number in BC will be the deposit number.

For additional questions about Business Central or Dynamics products in general, please reach out to us at Sales@BondConsultingServices.com or you can click here to schedule a free consultation with one of our Dynamics experts. You can also always visit our YouTube channel for helpful video walkthroughs and recorded product demonstrations.

Expected Inventory Cost Posting in Business Central
Understanding Automatic Cost Posting and Expected Cost Posting in Dynamics 365 Business Central is crucial for clients to Maintain Accurate Inventory Valuation:
- Both methods impact how inventory costs are reflected in your system. Automatic Cost Posting immediately updates the cost of your inventory when a purchase transaction (receipt) is posted. This ensures your inventory valuation is always current.
- Expected Cost Posting allows you to estimate the cost of purchased items before you receive the actual vendor invoice. This provides a preliminary cost for inventory items, giving you a more complete picture of your inventory value even when invoices are delayed.
Inventory Setup
Navigate to the Inventory Setup window using the search function in Dynamics 365 Business Central to access these toggled settings:

Automatic Cost Posting
- If toggled ON, inventory cost is posted to G/L during inventory receipt and/or invoicing.
- If toggled OFF, inventory cost is posted through the Post Inventory Cost to G/L
Expected Cost Posting
- If toggled ON, a “received but not invoiced” entry is posted to the inventory subsidiary and to an Interim Inventory account when goods are received into stock before the related invoice. In this case, the purchase order cost is booked as an interim inventory value for the item and a corresponding general ledger entry. When the invoice is received (and if the item has not been sold,) the inventory value is relieved from interim inventory and coded to inventory.
- Inventory Subsidiary = Inventory + Interim Inventory (received, not invoiced) G/L Accounts
- The default Interim Inventory account(s) can be the same as the Inventory account(s) or they can be separated and reported together on financials as inventory.
- In the General Product Posting Group, a default G/L account is required for the interim inventory.
- In Business Central
- PO Lines are coded as “Received but not Invoiced.”
- Sub Ledger (Value Entries), the fields that are used are “Expected Cost Posted to G/L” and “Cost Amount (Expected)” field.
- If Expected Cost Posting is toggled OFF, cost is posted during invoicing.
Automatic Cost Posting = Yes, Expected Cost Posting = Ye

Automatic Cost Posting = No, Expected Cost Posting = Yes

Here are some helpful articles from Microsoft for more information:
- Design Details - Expected Cost Posting - Business Central | Microsoft Learn
- Design Details - Accounts in the General Ledger - Business Central | Microsoft Learn
You can always reach out to our Dynamics 365 experts by emailing Sales@BondConsultingServices.com or by clicking here to schedule a free consultation to assess your business' needs.