
Extract Business Central Data using Configuration Packages
Extracting data from configuration tables, which store setup information for various functionalities, allows you to uncover hidden trends, create custom reports, automate tasks, integrate with external tools, and troubleshoot setup issues. From analyzing customer segmentation to optimizing inventory and monitoring workflows, configuration table data empowers you to make informed decisions and elevate your Business Central experience.
Dynamics 365 Business Central empowers data extraction, but managing massive tables can strain system performance. Configuration packs offer a solution for optimal data retrieval. By allowing you to specify the exact data sets you need, configuration packs eliminate unnecessary information transfer, reducing the processing burden on the system. This is particularly beneficial for large tables with many columns (over 100). Imagine extracting information from just four columns out of 14,000 items – configuration packs streamline this process, minimizing resource usage and ensuring efficient data retrieval without compromising system performance.
Follow these steps to access the configuration packages:
- In the global search, type Configuration Packages and select the appropriate link.

- A new package card can be created for specific extractions. To do this, click +New.

- Create a Code and Package Name

- Click the three dots to select your Table ID


- Click on the number listed under "No. of Fields Included."

- A screen will open which will allow you to remove data columns in your spreadsheet. To remove a column(s) uncheck the box under Included Field. Click the back arrow once you're done editing the spreadsheet columns. *By default, BC tables will have all available columns selected.

- Select Excel and then Export to Excel.

For more information about Business Central configuration packages or how to maximize your investment in general, please reach out to us at Sales@BondConsultingServices.com or you can visit our YouTube channel for helpful webinar recordings and product walkthrough videos. Alternatively, you can click here to schedule a free consultation with one of our Dynamics experts.

Updating Report Layouts in Business Central
Sometimes customers have presented a challenge with their invoicing process. A common requirement is the ability to flex between various invoice layouts based on different situations.
To update the layouts, you may follow the steps below:
- To identify the Report ID that will be needed you will need to click the Search icon, type in “Report Selection – Sales”, click the Report Selection – Sales link.

- Within the Report Selection – Sales window you will need to first select the appropriate report from the Usage drop-down and the report ID will be displayed.

- After noting down the report ID, you may click the Search icon, type in “Report Layout Selection”, and select the Report Layout Selection link.

- Within the Report Layout Selection window, type 1306 in the search, click the Select Layout icon, select the appropriate layout, and click Ok.
- Please note that if you are using a custom layout, you will need to update the layout type to “Custom Layout” before clicking select layout.

- Please note that if you are using a custom layout, you will need to update the layout type to “Custom Layout” before clicking select layout.
To update the email layout, follow these steps:
- Click the Search icon, type in “Report Selection – Sales”, click the Report Selection – Sales link.

- Click the Usage dropdown and select the appropriate report. Click the Email Body Custom Layout Description link, select the appropriate email layout, and click Ok.

For more information about Business Central layouts or other Dynamics 365 products, please reach out to us at Sales@BondConsultingServices.com or you can click here to schedule a free consultation with one of our Dynamics expert consultants. Alternatively, you can always visit our YouTube channel for helpful product walkthroughs and recorded webinars.

Simple Object Design in Business Central
Simple Object Design in Dynamics 365 Business Central is an easy way for users to customize their Business Central environments without having to be an expert programmer. Often, the end user wishes for the ability to do what programmers do – magically add fields and conduct other customizations within Microsoft Dynamics 365 Business Central. Sure, Personalization and even Design may be conducted to move and remove fields from screens. But such activity represents minor “customizations” at best.
Simple Object Designer (SOD), developed by Erik Hougaard, provides an intuitive user interface for completely customizing Business Central. SOD will let you add fields to screens, reports, and other objects. You can even add calculated fields. In addition, you can create new Roles within Business Central from scratch! Instead of using Application Language programming, rely on SOD.
Creating New Fields
Use the search function within Business Central to locate Simple Object Designer:

Tip: Instead of clicking the link for Simple Object Designer shown above, select the “Bookmark” icon to the right. Doing so will place a link for SOD on Business Central’s Role Center. Instead of searching for SOD each time that you need to create or modify a customization, simply click the link for one-touch access to SOD!
Recently, we at Bond Consulting Services conducted a customization for Business Central’s Chart of Accounts. An end user asked to have two fields added on both the “G/L Account Card” Page and the “Chart of Accounts” List.
Specifically, the user asked for Account_Group and Description as two new fields.
Account_Group is a four-digit number denoting sections of the chart of accounts, as follows:
- 1000 = assets,
- 2000 = liabilities,
- 3000 = equity,
- 4000 = sales revenue and cost of goods sold,
- 5000 = administrative expenses,
- 6000 = selling expenses,
- 8000 = miscellaneous income and losses on sale of fixed assets, and
- 9000 = temporary accounts.
Description is a text field complementing the “Name” field in the Chart of Accounts.

To create such additional fields for the user, we clicked Create new fields on existing tables in the upper left of SOD.

Obviously, clicking New in the “Create Fields” screen allowed for the creation of each field. Since the fields are similar, we’ll just discuss the “Description” field:

Using the “Table Name” field allowed us to search for the necessary table – G/L Account.
FieldNo is an automatically generated number.
In Field Name and Caption, we simply typed “Description”.
The Type chosen was “Text”, and we specified “50” for Size.

Returning to Create Fields, three columns on the right bear mention:
- Placed on pages – provides access to any page containing general ledger accounts.
- Field Transfers – allows data to travel from G/L Account to any other table.
- Placed on reports – provides access to any report containing general ledger accounts.

In using the “Placed on pages” column, the “Field Placements” screen appears. The “Where” and “Anchor” columns on the right show that we decided to place the new “Description” field after the “Name” field in both the “Chart of Accounts” List and “G/L Account Card” Card.
Going back to the main screen for SOD and clicking "Publish" and then “Yes” allowed us to see the new fields.
This is the “Chart of Accounts” List showing the new “Account_Group” and “Description” fields: 
The corresponding Card for account number 1111800 shows the two new fields, as well:

Creating a Calculated Field
Let’s, now, create a calculated field in Business Central by clicking Page Calculated Fields in SOD.
 Once you have clicked New and filled in the applicable fields, click the “Edit Expression” button at the top.

Within Edit Expression we have created a concatenated text formula to display the phrase, “Terms and Conditions”.
Click Verify Expression and ensure that the “Test Result” field displays “OK”.
Now, let’s return to the “Calculated Fields” screen.

The “Page”, “Where”, and “Anchor” columns show that SOD will place this field after the “Name” field of Bank Account Card.
Also, the “Drilldown Page No.” column shows that SOD has created this calculated field as a drilldown field. Specifically, clicking within this field will drill down to Page 8 – the “Standard Text Codes” screen.
One we have published this, we see this new calculated field in Bank Account Card where we can drill down:


Although we didn’t need to click on it within this example, you may have noticed that Edit Expression contains a button at the top labeled “Cheat Sheet”.

As expected, the “Cheat Sheet” screen provides variables that you can use in formulas. The variable highlighted shows that the screen’s “Name” field will be used, if selected.
When creating a calculated field for a screen containing transactions, you can create mathematical expressions.
Creating a Role Center
Selecting Create new features and clicking the “New Feature” button in SOD allows us to create new Business Central Roles.

Appearing in the top right of the “CUSTOMERITEMS” feature, Business Manager SOD Example is the name of the new Role:

The “Actions” section contains five “Action Group” selections:
- Top Menu – places the object at the top of the Role Center;
- Creation – initiates a transaction;
- Navigation – not used to create a role;
- Processing – conducts a task for an object; and
- Reporting – prompts the user to generate a report.
Caption in the far right of the “Actions” and “Role Center Parts” sections contains the names of the items that will appear within this Role Center:
- The Customers,
- Create Sales Order,
- Customer Sales,
- Payables Activities, and
- Receivable Activities.
Next, we click Publish.
The bottom of Business Central’s Available Roles contains our new Role, for selection!


NOTE: SOD should be installed and used only within a Sandbox environment. In a Sandbox, development can be conducted without risk to Production. Once testing is complete, SOD can generate an extension (i.e., .app file) for uploading into Production.
For more information about SOD or how to maximize your Dynamics 365 Business Central environment, please reach out to us at Sales@BondConsultingServices.com or click here to schedule a free consultation with one of our Dynamics experts. Alternatively, you can always visit our YouTube Channel for helpful product videos and recorded webinars.

How-to Void Receivables Transactions Credit Memos in Dynamics GP
Even the most meticulous accountants encounter situations where an invoice needs to be corrected. Perhaps a pricing error slipped through, a customer returned merchandise, or a simple data entry mistake skewed the amount due. In these scenarios, credit memos can be voided by navigating to the Receivables Posted Transaction Maintenance window (accessible via Transactions >> Sales >> Posted Transactions).

Within the Receivables Posted Transaction Maintenance window you will look up, or enter, the Customer ID and then look up the credit memo or A/R transaction that you want to void.

Once the desired A/R transaction has been selected, you will want to validate the Void Date and Posting Date. The Void Date and Posting Date are important because the dates could be referencing a closed month, but you could just reference the same dates that were used when the entry was posted to back out the activity on the A/R subledger.

Lastly, click on the Void button at the bottom right side of the window to kick off the void process. You can enter an additional transaction or change the Customer ID to void another transaction if you choose to do so. The posting journals relating to the voided transactions will not print until you close the Receivables Posted Transaction Maintenance window.
For any further questions about Dynamics GP please reach out to us at Sales@BondConsultingServices.com or click here to schedule a free consultation with one of our GP experts. Alternatively, you can visit our YouTube channel for helpful video walkthroughs and product demonstrations.

Finding Data in Business Central
Capturing and extracting data is one of the primary functionalities of Business Central. Being able to easily find your most important business data boosts employee's everyday efficiency and allows for informed decision-making. Business Central also offers export options that allow you to extract data for analysis in specialized tools. Here are a few of the top ways to find specific data in Business Central.
Edit in Excel
Likely, the simplest and most versatile method of extracting data is using Edit in Excel in List windows such as Customer Ledger Entries. Not only can you export data and create Microsoft Excel pivot tables and charts, but the data is also refreshable. Data in Excel will be updated upon reopening its workbook at any point in time. 

Exporting from Business Central Reports
Although the results are static and not refreshable, Business Central allows for data mining by exporting its reports to Excel!
In the case of the “Customer – Order Detail” report, sending to “Microsoft Excel Document (data only)” will allow you to create a professional looking pivot table and charts.


Configuration Packages
Even though its exported Excel workbook is not refreshable, a Configuration Package represents yet another means of creating a meaningful report for modules such as Fixed Assets.


Search Company Data
Simply by using the search button, any sort of master windows or transactions can be found. Just type any piece of data into the search field.

For example, clicking “Search company data” displays hyperlinks for viewing either master or transactional data. 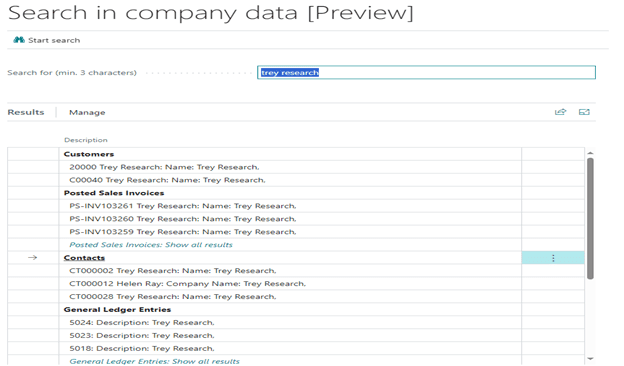
"Find Entries”
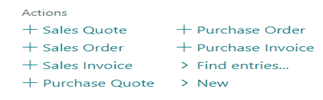
Depending on the Role used, the Role Center displays a feature in the “Actions” pane labeled “Find entries…” allowing you to search for any document, business contact, or item reference.
 Entering a Posting Date and clicking
 ![]() displays hyperlinks for associated documents.
displays hyperlinks for associated documents.

Table Information
Searching on “table information” brings you the full list of tables for Business Central.
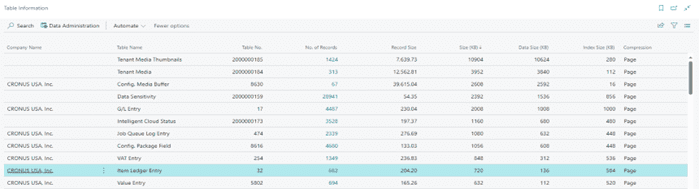
Clicking 682 in the “No. of Records” column of the Table Information window will display the Inventory Subledger, while clicking 694 in the “No. of Records” column of the Table Information window will display Inventory Valuation.
For more information about data mining in Dynamics 365 Business Central, please reach out to us at Sales@BondConsultingServices.com or click here to schedule a free consultation with one of our Dynamics experts. Alternatively, you can visit our YouTube channel for helpful product videos and recorded webinars discussing various Dynamics products' functionality.

Human Resources Data in Business Central
While the core functionality of Primo Payday within Dynamics 365 Business Central lies in streamlining payroll processing, its capabilities extend significantly beyond traditional salary and tax calculations. This add-on offers a robust suite of Human Resources features that are often overlooked. The following information focuses on data contained within the Payroll Employee Card in Business Central, simply navigate to Related > HR Employee Information.
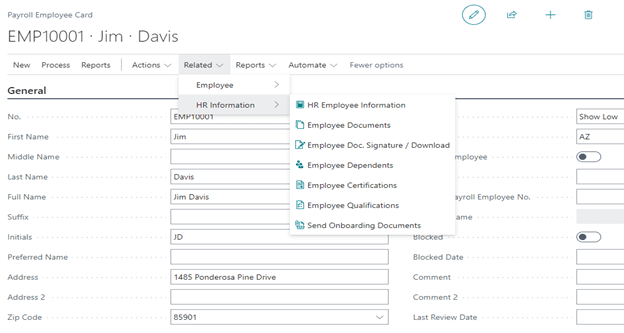
HR Employee Information
Former employers, review scores, and years of experience are examples of details that can be maintained within the “Employee HR Tracking” window. In this scenario, we can use a Boolean value to determine if Jim Davis was offered a relocation package when he first came onboard.

(“Boolean”, “Code”, “Text”, “Decimal”, “Time”, and “Date” are all selections for Value Type.)
Employee Dependents
Emergency contact and life insurance data represent some of the important items found within the “Payroll Employee Dependents” window.

Employee Certifications
Of course, the “Payroll Employee Certifications” window maintains crucial certification and compliance data.

This feature is not simply a repository. You can enable alerts for when certification expiration dates are approaching and even halt payroll runs in such circumstances.
To set up such alerts, navigate to the “Certification Code” drop-down list and choose ![]() .
.

Send Onboarding Documents
Finding Send Onboarding Documents by navigating to Related > HR Information allows for e-mailing of such documents directly to an employee’s e-mail address.
Before trying to use this window, however, ensure that you search in Business Central for the “Onboarding Documents” administration window:

While in Onboarding Documents, click Upload File.

Next, navigate to click here to browse.

After selecting the file in the “Open” window and entering a “Code” and “Description”, Onboarding Documents will have its required fields updated. In the example below, the Policy Manual was uploaded.

The “State Filter” and “Payroll Division Code” fields are optional filters but can be helpful in e-mailing documents to your employees.

For more information about Business Central payroll capabilities or specifically the Primo Payday add-on, please reach out to us at Sales@BondConsultingServices.com or you can visit our YouTube channel to browse our product tutorials and recorded walkthroughs. Alternatively, you can click here to schedule a free consultation with one of our Dynamics 365 experts.

Dynamics GP Bank Deposits SmartList
Having a SmartList in Dynamics GP for bank deposits within a specific date range offers a powerful advantage. This list includes crucial details such as deposit date, checkbook identifier, and deposit amount, eliminating the need for manual searches through individual transactions. This enhanced functionality facilitates efficient bank statement reconciliations, enables insightful analysis of deposit trends over time, and empowers you to readily identify specific deposits for further review.
Below are the steps in setting up a SmartList of bank deposits that were processed in Dynamics GP for a particular date range…
- Open up the SmartList window and expand the Bank Transactions folder and click on the Default (*) SmartList.

- Click on the Columns button within the menu ribbon along the top of the window to add new columns.

- When the Change Column Display window appears, click on the Add button; then click on the Available Columns drop-down menu and select ‘All Columns’.

- There are 3 columns we would recommend adding, they are as follows:
- Adding columns is a matter of selecting them in the Columns window and clicking the ‘OK’ button.
- Several columns can be added by holding down the CTRL button on the keyboard and making multiple columns selections; only clicking the OK button once when you are finished with your selections.

- Once you are done selecting/adding new columns, click ‘OK’ on the Change Column Display window.
Next, you will want to save your changes by clicking on the Favorites button and type a name for this particular SmartList; in this case we typed in ‘Bank Deposits – 2023’. You will want to click on the Add button and select ‘Add Favorite’ to save the changes.

- After the SmartList refreshes, click on the Search button within the menu ribbon.

- We recommend starting the search criteria with the ‘TRX Date’ and the ‘Checkbook ID’. It may make sense to add an additional search field to excluded voided items, you can include the ‘Voided’ field from the "All Columns" list.
The Maximum Records count may need to be increased if you have a large number of transactions (highlighted below). Click the OK button within the menu ribbon to close the Search window.

- After your SmartList refreshes, you will want to click on the Favorites button again to save your changes; this time you will click on the ‘Modify’ button to save the changes to the newly created Bank Transactions SmartList.

- As a last step, review the results of the SmartList and adjust the search criteria as needed.
If the placement of the columns needs to be changed, click on the Columns button on the menu ribbon and select the column, or columns, to be moved. Once selected, you could click on the arrow buttons along the right side of the Change Column Display window to move columns around.

If any changes are made, be sure to save them; the same steps referenced above on Step 9.
For any additional information on Dynamics GP or how your business can benefit from migrating to Dynamics 365 Business Central, please reach out to us at Sales@BondConsultingServices.com or you can visit our YouTube channel for helpful product videos and functionality walkthroughs. Alternatively, click here to schedule a free consultation with one of our Dynamics experts.

Why are my Dynamics GP database backups failing?
After the “sa” login has been reset, there is important Dynamics GP information that needs to be validated to prevent the Dynamics GP SQL Server database backups or other SQL Server jobs from failing.
Within SQL Server Management Studio, you will want to expand the Management folder, then expand the Maintenance Plans folder; within the Maintenance Plans folder you will see the current plans listed. If you double-click the plan, you will see the plan properties similar to the one captured below. 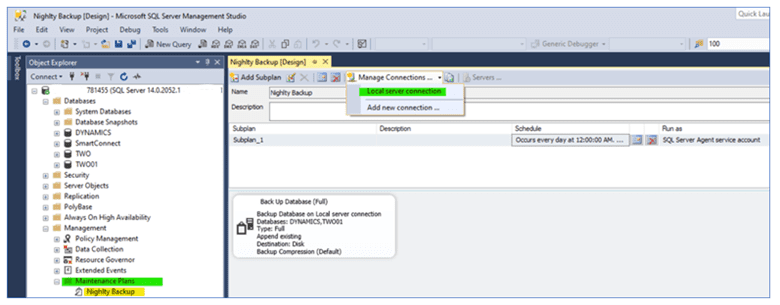
Click on the Manage Connections option and then select Local Server Connection to display the Connection Properties window.
If you are using the ‘sa’ login to establish the connection to the SQL Server, you will need to update the ‘sa’ password.
If you use the Windows NT Integrated Security option, you do not need to change anything.
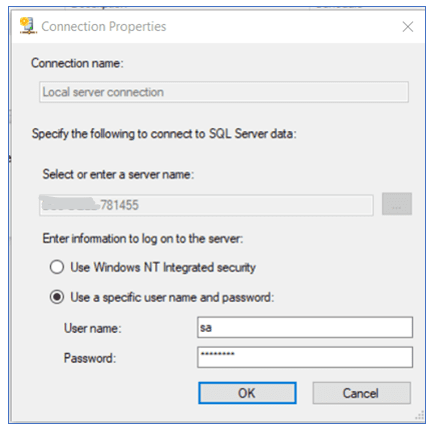 Click the OK button after updating the ‘sa’ password.
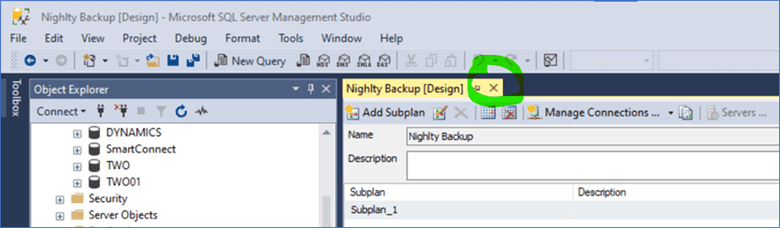
Close the Maintenance Plan by clicking the X next to the plan name (circled below) and save the changes that have been applied.
 This process will need to be repeated for any other SQL Server jobs that are listed within the Maintenance Plans folder.
For any clarification on this process, or questions about Dynamics GP in general, please reach out to us at Sales@BondConsultingServices.com or visit our YouTube channel for helpful recorded walkthroughs and product tutorials. Alternatively, you can click here to schedule a free consultation with one of our Dynamics expert consultants.

Post Close Income Statement Adjustments
Bond Consulting Services understands that accurate financial data forms the bedrock of any successful enterprise, and the "Close Income Statement" process within Dynamics 365 Business Central plays a pivotal role in guaranteeing its veracity specifically at the year-end close period. This feature transfers the year's result to an account in the balance sheet and closes the income statement accounts. This is done by the creation of a journal entry, which is then posted to reflect the necessary changes for each account.

Finally, after the closing is completed, there are scenarios where auditors will ask for post year-end adjustments to be made in the balances of general ledger accounts. These adjustments can be made in Business Central by simply following the steps below:
- Changing the allowed posting from date in the General Ledger Setup to the date of the adjustment.

- Recording/Posting the general journal with the adjustments needed.
- If the accounts adjusted were Income Statement accounts, you will then need to re-run the Close Income Statement process for the year once again to reflect the changes as needed to the necessary general ledger accounts.
Once posted, this will guarantee that your financial data is accurate for any reporting needs within Business Central.
For any questions about the Close Income Statement process or how to maximize your Dynamics investment, please reach out to us at Support@BondConsultingServices.com or you can click here to schedule a free consultation with one of our expert Dynamics consultants. You can also visit our YouTube channel for helpful walkthroughs of Dynamics 365 product capabilities.

Email Setup in Dynamics 365 Business Central
Eliminate email chaos with Dynamics 365 Business Central. Setting up an email within Business Central allows you to run specific email scenarios to automatically send important reports like purchase orders and invoices without having to open an email app.
- In the global search, enter "Email Accounts" and select the option in red.

- Select New > Add an email account.

- Select Next

- Select the option for the email type you would like to setup and click Next.

- Follow the steps for the email setup.
- Once it is setup, it will show up in the email accounts list.

To confirm all is working as intended, you can send a test email under Process > Send Test Email.

Once it is setup, that will enable the emailing function within BC.
Email Scenarios
If you need certain documents to be sent from a specific email, you can setup Email Scenarios.
In the Email Accounts page, you have an "Email Scenarios" option.

This option will allow you to set specific documents to be sent from a specific email address that is setup within the system.

Anything that is not assigned will be sent through the default method. Here is a link from Microsoft that further describes this functionality. For any additional questions, feel free to reach out to Sales@BondConsultingServices.com or you can click here to schedule a free consultation with one of our Business Central expert consultants. Alternatively, you can visit our YouTube channel for helpful videos and walkthroughs of Dynamics 365 capabilities.