
Conquering Drop Shipments
In today's fast-paced world, businesses are increasingly turning to drop shipments to fulfill customer orders. This approach frees up valuable storage space and inventory costs, but it also introduces new complexities in managing and tracking goods. Dynamics 365 Business Central offers powerful capabilities to simplify drop shipment management and ensure smooth fulfillment:
- Seamless Integration: Say goodbye to data silos and manual processes. Dynamics 365 Business Central seamlessly integrates with your sales and purchase orders, automatically creating drop shipment requests when needed.
- Enhanced Visibility and Control: Gain complete visibility into your drop shipments with real-time tracking. You can easily monitor the status of each shipment, from pick-up to delivery, and identify any potential delays or issues. This proactive approach ensures you can proactively communicate with customers and react to unexpected events.
- Optimized Inventory Management: Even though the goods might not be physically located in your warehouse, Dynamics 365 Business Central allows you to effectively manage drop shipment inventory. Allocate stock virtually, track reserved quantities, and receive automatic notifications when inventory levels fall below pre-defined thresholds. This ensures you maintain optimal stock levels and avoid stockouts.
- Comprehensive Reporting: Gain valuable insights into your drop shipment performance with comprehensive reporting tools. Analyze trends, identify areas for improvement, and measure the impact of drop shipments on your overall business performance. Data-driven decision-making is key to optimizing your drop shipment strategy and maximizing its benefits.
Dynamics 365 Business Central is one of the most flexible and customizable ERP systems in the market. With some customization, expert users can configure conversions in their drop shipments to seamlessly reconcile discrepancies between your vendor’s product offerings and your own sales orders. For example, if your vendor sells a specific product in bulk quantities, while you offer it in individual units to your customers, you can define a rule that automatically converts the bulk quantity from your purchase order to the individual units on your sales order. This ensures accurate inventory tracking and eliminates the need for manual adjustments.

Ready to unlock the power of Dynamics 365 Business Central for your drop shipment operations? Schedule a Consultation and let our experts guide you on your journey! You can also visit our YouTube channel for helpful videos about all Dynamics 365 products.

Features of the Barcode Scanning Module in Dynamics 365 Field Service
Field Service Technicians are Critical
The dynamic world of field service thrives on efficiency and accuracy. Technicians are the critical links, ensuring equipment operates seamlessly and homes remain comfortable. Yet, manual data entry and outdated processes can drain their time and focus. Dynamics 365 Field Service presents a powerful solution: the Barcode Scanner module.
Upon arrival at a client's location, a field service technician typically encounters equipment malfunctions. Traditionally, this necessitated time-consuming navigation through paperwork or deciphering handwritten notes. However, the innovative Barcode Scanner module for Dynamics 365 Field Service eliminates such inefficiencies. With a single, swift scan, the technician gains immediate access to the relevant work order, service history, and even crucial equipment manuals – all conveniently presented on their mobile device. This transformative technology empowers technicians by streamlining data acquisition and replacing tedious manual processes with unparalleled efficiency. Consequently, they can now confidently focus their efforts on promptly and accurately resolving client issues.
Benefits:
- Enhanced Data Entry Accuracy and Speed: Barcodes eliminate typos and misinterpretations, ensuring data integrity while accelerating information capture. Technicians complete tasks faster, maximizing their service impact.
- Streamlined Workflows and Increased Productivity: Accurate data translates to smooth operations, allowing technicians to handle more work orders per day and elevating customer satisfaction.
- Simplified Information Access: Scan a barcode – instantly access the information you need. Asset details, work order specifics, or customer records are readily available, removing the need for time-consuming searches.
- Offline Accessibility: Connectivity interruptions no longer hinder productivity. Scanned data is stored locally on the device, enabling technicians to continue tasks even in remote locations.
Beyond streamlined information gathering, the Barcode Scanner module empowers strategic operations:
- Inventory Management: Track parts and equipment effortlessly. Scan to update stock levels, identify missing items, and optimize inventory control.
- Warranty Verification: Eliminate the need for paper records. Scan product barcodes to seamlessly verify warranties and avoid delays.
- Compliance Tracking: Ensure regulatory adherence by scanning to document specific actions or safety checks. Maintain audit-ready operations with ease.
The Barcode Scanner module is a transformative tool for Dynamics 365 Field Service. It empowers technicians and provides valuable insights by streamlining your most important processes with cutting edge business technology. For more information, please reach out to us at Sales@BondConsultingServices.com or you can click here to schedule a free consultation with one of our Dynamics experts. You can also check out our YouTube Channel for helpful videos about Dynamics products.

Updating Business Central from Microsoft Teams Premium
Thanks to Microsoft's collaboration tools, accountants can easily update Business Central with data residing in Microsoft Teams Premium.
This article outlines five steps in such a process, as follows:
- Access “Recap” in Teams Premium.
- Normalize the data, if not already done.
- Upload the data to a Teams channel.
- Use Microsoft Fabric to review the data in Power BI for approval; and
- Import the data into Business Central from Microsoft Fabric.
1) Access Recap in Teams Premium
After your meeting concludes in Teams premium, choose "Recap" to find the required data to import into Business Central.
The example below features an Excel spreadsheet containing forecasted inventory quantities for the new fiscal year 2024, as composed and submitted by the board of directors. Please download the spreadsheet as shown in the example by navigating to the Recap tab and clicking into the appropriate record.

2) Normalize the Data, If Not Already Done
In order to import the spreadsheet into Fabric for use in the Power BI service, the data in Excel must be formatted as a table. In case the data is not already formatted as a table, please conduct the following tasks:
- Select the range of cells you want to format as a table.
- Within the “Home” tab’s “Styles” section, click the “Format as Table” button.
- Choose a style for your table.
- Within the “Create Table” dialog box, set your cell range.
- Mark if your table has headers; and
- Select OK.
3) Upload the Data to a Teams Channel
Within your Teams channel, upload the spreadsheet. As seen here, 2024 Forecast has been uploaded to a channel called “Business Central Demand Forecast Entries”: 
4) Use Microsoft Fabric to Review the Data in Power BI for Approval
To enter Power BI within Fabric, access the Power BI app in Teams as shown in the following scenario: 
Now that you have opened the Power BI Service within Microsoft Fabric, click My Workspace.
Then, click the “New” button and choose Semantic model:

Power BI’s “Semantic model” is a source of data that is ready for reporting and visualization in the Power BI Service.
Speaking of “source of data”, click the Excel button as seen below.

Next, browse to the saved “2024 Forecast” spreadsheet in the “Business Central Demand Forecast Entries” channel and click Import. 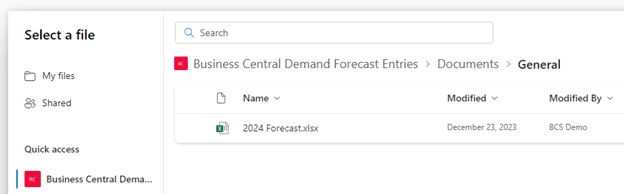
Now that the data has been brought into Fabric, click Explore this data > Create a blank report:

Just as in the Power BI Desktop application discussed in previously published blog articles, the Power BI service allows access to Visualizations and other tools for creating valuable charts and other business objects.
The example below shows charts based on three Visualizations – Clustered column chart, Q&A, and Smart narrative.
Such charts prove useful in determining if the data provided warrants importing into Business Central’s forecasting tools. 
5) Import the Data into Business Central from Microsoft Fabric
The final step is to open “Demand Forecasts” by typing it in the global search: 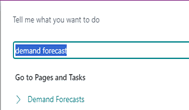
After clicking “Demand Forecasts” within the “Search” window, find the Demand Forecast that you want to update based on the data reviewed in the Power BI service.
Next, click Demand Forecast Entries. 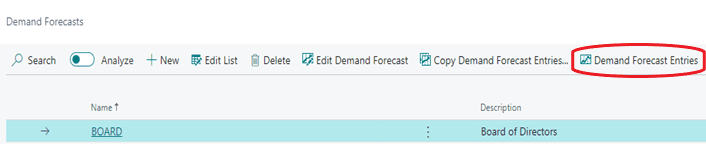
Click the “Share” button:
Then, choose “Edit in Excel”: 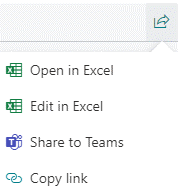
From within the resulting spreadsheet, browse out to the data within Power BI by navigating to Get Data > From Power Platform > From Power BI. 
Upon finding 2024 Forecast in the “Power BI Datasets” pane on the right, choose Insert Table:

On the right-hand side of Create Table, that the data is going to “pull” from the table held in the Power BI service. 
Upon clicking Insert Table, the data from Power BI will be placed into a separate tab within the Excel workbook. In this case, the tab is called “2024Forecast”, as shown below.
![]()
From here, you could simply copy and paste the data from 2024Forecast to Sheet1. A better alternative, however, is to use an Excel macro to automatically conduct this work.
The next information below discusses how to create such a macro.

After clicking the “Record Actions” button in Sheet1 shown above, you will choose to start recording. Excel will record your copying and pasting from 2024 Forecast to Sheet1.
Specifically, you’d copy and paste into Sheet1’s “Item No.” column, “Forecast Quantity (Base)” column, and “Forecast Quantity” column.
After clicking Stop recording, click Publish to update the “Demand Forecast Entries” window of Business Central:
 You may save the spreadsheet and use it again if you ever need to update Business Central’s forecast in the future, simply click “Enable Content”, upon reopening the spreadsheet.
For more information about how Bond Consulting Services can maximize your Dynamics 365 investment, please reach out to us at Sales@BondConsultingServices.com or click here to schedule a free consultation with one of our Dynamics experts.
You can also visit our YouTube channel for helpful videos about every aspect of Dynamics 365.

Distribute Expense or Revenue Allocation in Business Central
Business Central Wave 2 of 2023 (version 23) released a new functionality to allocate expenses and simplify invoice data entry: Allocation Accounts.
Allocation Accounts lets you define expense or revenue allocation on distribution criteria that could be fixed or variable and that you can use in sales and purchase documents or general journals.
For example, for fixed allocation of Office Supplies expenses, you can distribute costs based on the headcount or share and assign each Department or Section a portion of the total amount. For this, you define as many lines as needed for each Department/Section and indicate the headcount.
Define Allocation Accounts
Fixed Allocations:
Use this method to allocate a set percentage to each line.
- Use the global search to search Allocation Accounts and open the suggested link.
- Click on +New to define a new Allocation Account.
- Enter the No. and Description. The No. could be the G/L Account you want to allocate, or a text indicating what it is, or it could be an unrelated code.
- Select if the Account Type is Fixed or Variable. For this example, we are going to use Fixed.
- In the lines, select whether it is a G/L Account, a Bank Account, or if the account should be inherited from the parent. For this example, we are going to use G/L Account.

- Enter the expense or revenue G/L Account; Business Central will populate the Description.
- Select the Department Code (or criteria for the subdivision). You might need to add it to the form if it is not visible. Use the Dimension button to assign a value.
- And lastly, enter the Share; the Share could be a weighted value, the headcount, or any other value that will help you distribute the expense or revenue. The Percent column is not editable; Business Central adjusts the value as you type a value in the Share field.

Define as many Allocation Accounts as needed.
Variable Allocations:
Use this method to allocate a variable percentage to each line based on values that change over time.
- Use the global search to search Allocation Accounts and open the suggested link.
- Click on +New to define a new Allocation Account.
- Enter the No. and Description. The No. could be the G/L Account you want to allocate, or a text indicating what it is, or it could be an unrelated code.
- Select if the Account Type is Fixed or Variable. For this example, we are going to use Variable.
- In the lines, select whether the destination account type is a G/L account or a bank account or if the account should be inherited from the parent. For this example, we are going to use G/L Account.
- Enter the destination G/L Account number; Business Central will populate the name.
- Select Statistical Account in Breakdown Account Type. For this example, we are using the Head Count Statistical Account that has a different value per Department Code.
- Enter the Statistical Account number; Business Central will populate the name.
- In the Calculation Period, select the Period used to distribute the allocation. For this example, we are going to use Balance at Date.
- Select the Breakdown Account Balance Filters to assign a Dimension Value to filter by.

Test Amounts Distribution
To see how the amounts are distributed, use the Test Allocation button. Enter the amount to distribute in the Amount to Allocate field and the Posting Date field.
Posting Transactions with Allocation Accounts
The new Account Type, "Allocation Account," has been added to Sales and Purchase documents and several Journals, which could be defined with the same number as the G/L Account or any value that makes sense. Instead of entering the G/L Account and X number of lines to distribute the cost, you select the Allocation Account Type and the Account No. The amount will be automatically distributed to the departments defined on the Allocation Account page.
 You can see how the amount is distributed with Preview Posting, or under the Line menu, select Functions > Redistribute Account Allocation to also have a chance to make amendments if necessary.
 This long-awaited functionality has been implemented for several customers already; if you are interested or have questions, please get in touch with a representative from Bond Consulting Services through Sales@BondConsultingServices.com or click here to schedule a consultation with one of our Business Central experts.
You can also find information on Business Central and other Dynamics 365 products on our YouTube channel.

Using the Help Button in Business Central
Don’t Be Afraid to Ask for Help
Some users are dismissive of accessing Dynamics 365 Business Central’s “Help” section. This is an extremely resourceful tool in Business Central that should not be overlooked. Microsoft has strategically built a comprehensive self-help platform specifically tailored to empower Business Central users of all backgrounds and learning styles. Whether you’re a “visual person” who likes to watch videos or someone who prefers to simply read up on the solution, there are ways to solve any problem you may be experiencing.
Users can choose from an array of videos, tutorials, step-by-step guides, and detailed articles, each format crafted to foster independent discovery and skill development. By embracing the Help button, individuals transform from passive navigators to self-sufficient masters of Business Central, tackling challenges with confidence and optimizing their overall productivity.
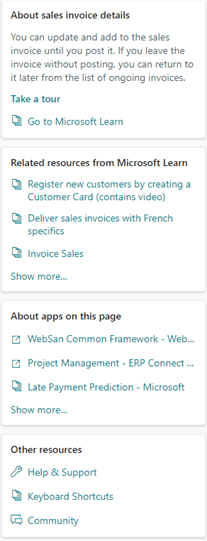
Finding Support
Clicking this question mark icon, ![]() as found in the upper right of Business Central, provides unbelievably valuable information. In the next few pages, we’re going to break down the sections shown here:
as found in the upper right of Business Central, provides unbelievably valuable information. In the next few pages, we’re going to break down the sections shown here:
Learning
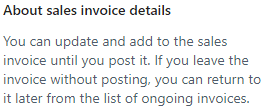
The first best step in solving a problem is to learn more about the issue. That’s why the very beginning of Help fully describes the window that you’re working in.
The example used in this article is the Sales Invoice screen, described here:
Beneath this description, Microsoft provides the ![]() hyperlink. As seen here, clicking this link walks you through a wizard detailing the major features of your screen:
hyperlink. As seen here, clicking this link walks you through a wizard detailing the major features of your screen:
 The final section in learning is the
 ![]() link.
link.
In this instance, details on how to enter and update a Sales Invoice are provided through this Microsoft Learn article.
Thinking Out of the Box
Sometimes, a solution can only by found elsewhere.
Microsoft developers have been practicing this “out of the box” thinking for decades and have, therefore, provided related but outside resources to assist in completing the task that you’re working on.
The list seen within the screenshot below, for example, begins with a link containing a video tutorial on how to register a new Customer:

When following this link, this is the title screen of the video you are directed to.

Teamwork Makes the Dream Work
Remember that many trusted Microsoft Partners in our Community provide invaluable “add-ons” to the core Business Central product.
These additional products command not only respect but attention to detail.
For this reason, Help lists these in About apps on this page. If you think about it objectively, clicking any of these links might show that a setting in one of these add-ons needs to be configured to eliminate the error you may be encountering.

Going the Extra Mile
No matter how many resources or how much effort is required, Microsoft provides numerous tools in the final section of Help called “Other resources”:

Documentation, blog articles, future release plans, and a place to voice your ideas are all found in Help & Support.
In case logs and other resources on your error need to be provided to Microsoft Support Engineers, Help & Support’s “Troubleshooting” section gives you access to the Performance Profiler and even debugging of Business Central’s programming code – Application Language.
Also, you may download a PDF referencing the list of Business Central’s keyboard shortcuts:
Finally, clicking Community takes you to the indispensable Business Central forum where you may directly ask our Community’s MVPs for solutions.
Simply by logging in with your Microsoft 365 credentials, you’ll gain free support with a reasonable turnaround time! You can post your own questions using the button in the top right corner.

For more information about how to maximize your Dynamics 365 Business Central investment, please reach out to Sales@BondConsultingServices.com or you can click here to schedule a free consultation with one of our Dynamics experts.
Improving Sales order Tracking
For many businesses, intricate processes demand detailed status tracking, ensuring transparency and control. Dynamics 365 Business Central provides a robust platform for managing workflows, but its default Sales Order tracking field – Open, Released, Pending Prepayment – can sometimes prove insufficient for capturing the nuances of complex operations.
![]()
![]()
Bond Consulting Services empowers numerous clients with customized solutions that extend Business Central's capabilities to perfectly match their unique business needs.
In one instance, we encountered a client whose intricate production process required far more than three generic status labels. To address this, we implemented a custom field within Business Central. This new field offered a wider range of granular stages, reflecting the precise steps involved in their workflow. Moreover, we introduced a status log, meticulously recording every transition and the user responsible for it.
The benefits of this customization were evident:
- Enhanced visibility: The broader range of status options provided immediate insight into the precise stage of each process, eliminating ambiguity and confusion.
- Improved accountability: The status log fostered a culture of accountability, clearly documenting who made changes and when, streamlining communication and facilitating problem resolution.
- Optimized decision-making: With real-time data on process progress, managers were empowered to make informed decisions, optimize resource allocation, and anticipate potential bottlenecks.
Our client's experience exemplifies the power of tailored solutions within Dynamics 365 Business Central. By extending its capabilities, we enable businesses to gain control over intricate processes, achieve operational excellence, and unlock their full potential. For more information about how to maximize your Dynamics 365 investment, please reach out to us at Support@BondConsultingServices.com or you can click here to schedule a free consultation with one of our expert Business Central consultants.
You can also check out our YouTube channel for helpful walkthroughs and webinar recordings!

Using Business Central OData in Power BI
Although Microsoft Power BI can pull Business Central data from Excel files or Power BI’s “Dynamics 365 Business Central” data source, Microsoft recommends using OData queries.
OData is Open Data Protocol and, according to Microsoft, is an ISO/IEC approved and OASIS standard that defines best practices for building and consuming REST APIs.
A REST API is an interface that business applications use to transfer data over the internet securely.
By pulling data through an OData query, the Power BI report will be forever refreshable.
Many OData queries come “pre-aggregated”, meaning that there is less of a need to create formulas or conduct any other development within Power BI. In other words, much of the work is already done for you.
Not only does this method of data extraction lend credence to the “work smarter not harder” principle, but there is little doubt of the data that is displayed in Power BI.
Finding OData queries in Business Central is extremely easy. Begin by clicking Business Central’s search button in the upper right of the home screen and typing “web services”:

Since profit represents an excellent example of business reporting, type “profit” in the Web Services search field in the upper left. Highlight the query for Item Sales and Profit and click the OData URL found on the right:

*Simply cancel out of any additional browser tabs that may pop up during this step.
Next, click on and copy the OData URL appearing in the browser:
![]()
Now we will paste the URL into Power BI. First, navigate to Get Data, then OData feed.

Paste the URL into the “OData feed” window, and click OK:

As shown in previously published Power BI blogs, you can add Visualizations to the Power BI canvas such as the Table and Slicer. And immediately, valuable intelligence is displayed.
OData provides many functionalities, without having to perform major development efforts in Power BI!
If you’d like to learn more about the different functionality and how it may be right for your business, you can reach out to sales@lime-falcon-860444.hostingersite.com, watch detailed walkthroughs on our YouTube, or schedule a consultation.

Dynamics 365 Sales | Import/Update Complex Records Workaround
While leveraging the default key field is often sufficient for data imports in Dynamics 365 Sales, certain scenarios require a more nuanced approach. For records holding complex relationships with other entities, a single key may prove insufficient to ensure accurate updates.
The following steps below may be used to import/update data for records that contain other records from a related entity without using the default key field. This may be helpful depending on the type of data that needs to be imported/updated to more easily identify a related record.
- Once the import file is ready, you may proceed to navigate to the Entity that you would like to import data for.
- Within the entity, you may proceed to click the Import from Excel icon.

- The Choose File icon will have to be selected in order to select the import file.

- You may select the file to be imported, then click Open.
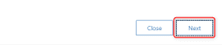
- Once selected, click Next located at the bottom of the window.
- Then, click the Review Mapping icon.

- Here, you will need to locate the record lookup field for the related entity value, then click the Magnifying glass icon.

- Click the “x” by the Name field or the default field and then you select the field that you would like to use as an identifier rather than the default field that would’ve been used.

- Once the appropriate field is selected, you may click Ok.

- Lastly, you may click the Finish Import icon to begin importing the data into the system.

- After importing, you will receive a message stating that the data has been submitted for import and you may either click Track Progress to see the progress of the import or you may click the Done icon to close out of the import.

For any questions about this or how to maximize your Dynamics investment, please reach out to Support@BondConsultingServices.com or click here to schedule a free consultation with one of our expert Dynamics consultants. Learn more about Dynamics 365 Sales or other Microsoft products directly from them!

How-to Change Default Reporting Runs
Are you regularly running reports in Business Central, and hate that you need to change the same options each time? You are not alone, and there is a solution for that if the Report does not have the "Use default values from" option enabled:


For example, for the second Report, you need to change the options each time, and chances are you will end up trying a few times until you get what you want, or you will add it to your cheat sheet to change the options accordingly. With Report Settings, you can make that Report remember your options.
Report Settings
Luckily for many, Business Central has a page to store default and custom settings and the same place used to save "Last used options and filters".

Search Report Settings and follow these instructions to add your custom or default settings for your Report; it takes about 10-30 seconds to set it up and will save you time in the future.
For example, you always run the Aged Accounts Payable Report and need to change the same options each time as Business Central might not remember them, and the option to save "Last used options and filters" is not available.

Steps to Define Your Default Report Options and Filters
- Launch the Report you want to define, for example, "Aged Accounts Payable".
- Click on Report Layout's ellipsis to open the list of Report Layouts, note the Report ID, and close the list with Cancel.

- Note and change the options you usually change and click on Preview or Print to ensure you get the expected results.

- Use the key combo "Alt + Q " to search "Report Settings" and open it.
- Use the Search box to find, for example, "Aged Accounts Payable." the first time, you will get no results with your User ID under "Assigned to".
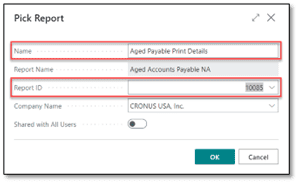
- Click New to pick the Report.
- Enter a name to identify the Report and the usage, for example, "Aged Payable Print Details."
- Select the Report ID, start typing the report names, and validate that the Report ID is what you noted previously.
- Leave the suggested Company Name; if you have multiple companies, you will need to repeat this process for each company.
- Select whether you want to share it with all users or not and click OK.
- The Report launch page opens; change the options as needed, add or predefine some of the filters, and click OK.
- Run the Report to validate that the "Use default values from" option is available. If you click on that field, the dropdown list should show the name you added. Select it, and the report options will change to what you selected when defining the Report Settings.

The next time you run the same Report, select your options from the Dropdown list or change them again, and Business Central will save your selections to "Last used options and filters." From now on, this Report will behave like most reports where that option is enabled by default, and there will be less trial and error to see which options change which settings to suit your needs.If you need to edit the defined options, use the Edit option in the Report Settings page and click OK to save the changes.For any questions you have about changing default report runs or how to optimize your Dynamics 365 Business Central investment, please reach out to Support@BondConsultingServices.com or you can click here to schedule a free consultation.

How-to control access to Smartlist in Dynamics GP
SmartLists in Dynamics GP are saved queries that allow users to quickly and easily access specific information within the system. They can be used to filter and display data from a variety of tables, including customers, vendors, transactions, and items. SmartLists can be customized to meet the specific needs of each user, and they can be shared with other users. One of our recent Dynamics GP clients inquired about a way to assign a specific SmartList to a user. To give a user access to only a specific subset of SmartLists, you will need to create a new Security Role and assign that to the user. To do so, you may follow the steps below:
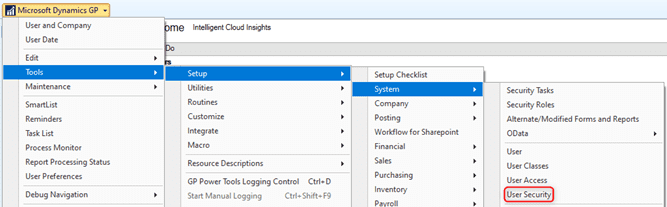
- Navigate to Microsoft Dynamics GP > Tools > Setup > System > Security Tasks.

- On the Security Tasks Setup window, you may create a new Task ID by populating the following:
- Task ID: The Name for the Task
- Task Name: The Name for the Task
- Product: SmartList
- Type/Series: SmartList Object(s)
- User Type: Full
You may mix and match the security based on the SmartList’ s name per the example below.

- Click Save.
- Navigate to Microsoft Dynamics GP > Tools > Setup > System > Security Roles

- Populate the following information on the Security Roles:
- Role ID: Set a name for the Security Role
- Role Name: Set a name for the Role
Here you can check the Security Task that was just created.

- Click Save.
- Lastly, you may navigate to Microsoft Dynamics GP > Tools > Setup > System > User Security.
- Then, you may select the User as well as the company to which you’d like the access to be set up for and then you may select the newly created security role.
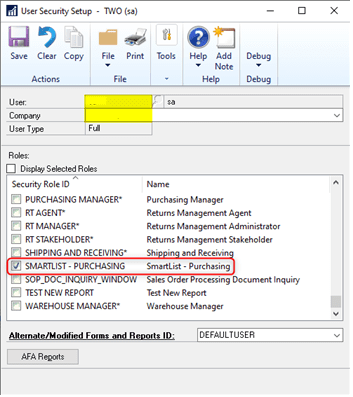
- Click Save once more, and you're finished.
For more information and assistance, please contact Support@BondConsultingServices.