
Import and Export Data in Business Central with Insight Works’ Free App
As a Microsoft Partner, we seek out various tools and solutions that synergize with Business Central to help streamline business processes, enhance productivity, and improve overall performance. One such tool is the incredibly useful Import Export PowerTool by our partner, Insight Works.
The Import Export PowerTool is a free app that provides users with the ability to import and export data from Dynamics 365 Business Central quickly and easily. It offers a range of features and benefits that make it an essential tool for any organization that relies on Dynamics 365 Business Central for their daily operations.
Here are some of the key features and benefits of the Import Export PowerTool:
- Streamlined Data Import and Export Process: The Import Export PowerTool streamlines the process of importing and exporting data from Dynamics 365 Business Central. It simplifies the process, allowing users to easily import and export data from multiple sources, including Excel, CSV, and XML files.
- Increased Efficiency and Productivity: With the Import Export PowerTool, users can save time and increase productivity by automating data import and export tasks. The tool allows users to schedule data imports and exports, ensuring that data is always up-to-date and accurate.
- Enhanced Data Quality: The Import Export PowerTool includes a range of data validation and verification features that help ensure data quality. Users can set up validation rules to ensure that data is accurate, complete, and consistent. This helps to prevent errors and improve overall data quality.
- Flexibility and Customizability: The Import Export PowerTool is highly flexible and customizable. It allows users to configure and customize the import and export process to meet their specific needs. Users can set up mappings and data transformation rules, create custom fields, and configure import and export templates.
- Cost-Effective Solution: The Import Export PowerTool is a cost-effective solution that provides a range of powerful features and benefits. It offers a low cost of ownership, making it an ideal solution for small and medium-sized businesses.
In conclusion, the Import Export PowerTool from Insight Works is a powerful solution that provides users with the ability to import and export data from Dynamics 365 Business Central quickly and easily. It offers a range of features and benefits that make it an essential tool for any organization that relies on Dynamics 365 Business Central for their daily operations. So, if you're looking for a reliable and efficient way to manage your data in Dynamics 365 Business Central, the Import Export PowerTool is definitely worth considering.
Get the Import Export PowerTool Now!

Using DAX to Create Custom Columns in Microsoft Power BI
Microsoft Power BI continues to provide our clients with up to date information to continue making great business decisions. An important aspect of Power BI is to optimize it to make sure the users are seeing the most relevant information. One way to make sure the visualizations and tables are reflecting the data concisely is to use DAX to create the necessary columns.
Microsoft Power BI displays Income and Cost of Goods Sold amounts, based on Account Categories and Dimension Value Codes found within Dynamics 365 Business Central. The visualizations below of a Power BI Table are referred to as Before and After in this blog.
As outlined in previously published blogs, the Business Central tables containing this data are Chart of Accounts, Dimension Set Entries, and General Ledger Entries (GL Entries).
Before:

After:

Although the data displayed within both objects is accurate, the After table offers the better presentation.
Within After, we have Income and Cost of Goods Sold amounts residing in separate columns and we have a column for Profit Margin. We’re able to analyze amounts for Dimension Value Codes based on Account Category, without having to display the Account Categories!
We are able to present the data in a more concise and accurate table by utilizing DAX.
What is DAX?
DAX stands for “Data Analysis Expressions”. According to Microsoft Learn, DAX is a “collection of functions, operators, and constants that can be used in a formula, or expression, to calculate and return one or more values.” Microsoft Learn, further, states that DAX creates new information from data already within your Power BI model. Using DAX allows you to create new columns within Power BI.
DAX Formulas
Again, the formulas or measures created using DAX are Income, Cost of Goods Sold, and Profit Margin:
- Income = (sumx(FILTER('G_LEntries', Related('Chart_of_Accounts'[Account_Category])="Income"), 'G_LEntries'[Amount]))*-1
- Cost of Goods Sold = sumx(FILTER('G_LEntries', Related('Chart_of_Accounts'[Account_Category])="Cost of Goods Sold"), 'G_LEntries'[Amount])
- Profit Margin = [Income]-[Cost of Goods Sold]
Creating a DAX formula begins, by clicking the “New Measure” button:

After typing the name of the measure, such as “Income” or “Cost of Goods Sold”, you enter DAX functions as follows:
- Sumx: returns the sum of an expression evaluated for each row in a table
- FILTER: extracts data from a table based on specified criteria such as “Account Category”
- RELATED: returns a related value from another table (“Income” or “Cost of Goods Sold”)
If you have any questions about Power BI data visualizaations, please do not hesitate to reach out to us at Support@BondConsultingServices.com or you can click here to schedule a consultation with one of our experts.

How-to Setup ACH Payments in Dynamics 365 Finance
Electronic funds transfer is a convenient way to process payments as it reduces the time to process payments and helps avoid fraud. This is a walkthrough on how to setup and process ACH files in Dynamics 365 Finance (and Operations).
To use ACH feature in Dynamics 365 F&O, we need the initial setup of:
- Bank account
- Vendor bank account
- Method of payment
- Prenotes (optional)
Bank Account Setup
- Navigate to Bank Accounts and specify the following information:
- in the General tab:
- Bank account
- Routing number
- Bank account number
- Main account – posting GL account.
- Currency
- Company statement name – legal entity name on the bank statement

- in the Additional identification tab:
- Company ID
- If Pre-notes are used, in the Payment management tab:
- select the Prenotes required field.
- Prenote response days
- in the Address fast tab
- Bank account address
- in the General tab:

Vendor Bank Account Setup
- Navigate to Vendor record tab > Setup > Bank accounts > enter the following information:
- Bank account
- Name
- Routing number
- Bank account number

- To set the created bank account, navigate to All Vendors > Payment tab > choose your Bank account

Method of Payment Setup
- Navigate to Method of Payment page. Enter the following fields:
- Method of payment
- Description
- Payment type
- Account type as Bank
- Payment account
- Export format as NACHA (US)
- Assign to Vendor Card under the Payments fast tab.

- In the Method of payment page, navigate to Payment specification. This step allows to classify the Standard Entry Class Codes within ACH export NACHA formats, which will be transmitted into bank. CCD and PPD are the most common formats used.
- Cash Concentration and Disbursement (CCD) is used when creating payments from vendor accounts.
- Prearranged Payment and Deposit (PPD) is used when creating payments from consumer accounts.
- Method of payment > Payment specification tab > +New. Enter Description and Export format as Standard NACHA-CCD

To set the created Payment specification, navigate to All Vendors > Payment tab > payment specification

Prenotes Setup
A prenote is used to test the zero-dollar bank transaction (test transaction) – it’s verified and sent before the actual real funds are used through the Automated Clearing House (ACH) network.
- Navigate to Accounts payable module > Periodic > Create prenotes > populate the fields as needed.

Payment Process
- Navigate to Vendor payment journal > create a new line > select the Generate payments.
- On the payment method, choose ACH (or electronic)
- On the export format field, choose NACHA (US)
- Choose your Bank account. OK.

- Ok > choose the parameters as needed.

- The Remittance document will generate. See sample below.

If you have any questions about the ACH feature or how to maximize your Dynamics 365 Finance investment please reach out to us at Suppor@BondConsultingServices.com or schedule a consultation with one of our ERP experts.

How Automatically Pay Vendors in Business Central
In Dynamics 365 Business Central, when a Purchaser makes an Advance Payment to a Supplier or Vendor, we can adjust/update the payment quickly and automatically when the Purchase Invoice is posted. This process is called Automatic Vendor Payments with reference to the Purchase Invoice.
Please follow the below steps to achieve the automatic vendor payments.
Step 1: Create a Checking Account named CHECKING.
Step 2: Create Payment Method:
- Create the payment method named SAMPLE and assign
- Account Type = Bank Account
- Account No. = CHECKING
 Step 3: Now assign the Payment method code to Vendor Card as shown below

Step 4: Now that you’ve created a Purchase order with the Vendor (specified above). As soon as Vendor is selected in Purchase Order header, the Payment Method Code = Sample will get assigned automatically (as shown below).

Step 5: Post Purchase Receipts & Purchase Invoice
- Select OK to post Purchase Receipt and Purchase Invoice

Step 6: Review Posted Automatic Vendor Payments
- Select Yes to review the Posted Automatic Payments as soon as Purchase Invoice is posted.

- To review the posted transactions or entries, select Process -> Find entries.

- Below image shows all the posted transactions, where you can see the Bank Account Ledger Entry

- Select the Bank Account Ledger Entry, where you will see that a Payment transaction is posted automatically.

- Go to Vendor Card and verify the Vendor ledger Entry, Vendor -> Ledger Entries

- In the Vendor Ledger Entry, you can see that the Document type = Payment and Remaining Amount = 0

The Automatic Vendor Payment has been posted automatically. For any questions about this process or how to optimize your Business Central environment please reach out to us at Support@BondConsultingServices.com.

What's New in Dynamics 365 Business Central Functionality 2023 (Wave 1)
Business Central (BC) version 22, also known as Wave 1 2023, is due for release in April 2023, and it comes with a good load of welcome changes and new features.
Quick Links:
- Posting Preview now available for the Item Journals
- Use Different G/L Accounts for AP and AR Transactions
- Mark EOM/EOY Closing Entries as Reviewed
- Ship and receive non-inventory items on warehouse documents
- Undo Transfer Shipments
- Modern Tooltips
- Add any Table Field to Pages
- Drag and Drop Files into BC Documents
- Use Your Keyboard More with Visible Shortcuts
- Reduce Clicks, Add Common Actions to the Actions Bar
- Get Asked to Reopen and Order if Changes are Required
Posting Preview now available for the Item Journals
We all have an "oops" moment, but with Posting Preview, you can review a posting before it happens.

Use Different G/L Accounts for AP and AR Transactions
For those rare transactions where the predefined Posting Group does not fit the bill, BC can let you select a different Customer/Vendor Posting Group with a new concept called Substitutions. Substitute posting groups can replace the default customer or vendor posting group specified for a customer or vendor.
Mark EOM/EOY Closing Entries as Reviewed
The General Ledger Entry page will have the option to mark G/L entries as reviewed. This process is useful to speed up period-end closing and reconciliation of G/L accounts.
Ship and receive non-inventory items on warehouse documents
Warehouse employees can ship and receive non-inventory items, such as insurance or cost, on sales or purchase orders along with the physical goods on the orders. Posting the Non-inventory and Service lines in the previous version was a separate process.
For Non-Inventory Items posting, there would be two scenarios:
- Post all Non-inventory lines on the source document as soon as at least one non-inventory Item is posted by the warehouse document.
- Post non-inventory lines of the source document linked to the Item via the "Attached to Line No." field when a warehouse document posts the Item.
This feature can be enabled on the Inventory Setup page by turning on the "Non-Inventory Items Posting Policy" toggle.
Undo Transfer Shipments
After reviewing the Transfer Order, you realize you made a mistake and need to undo the shipment, fear no more, "Undo Transfer Shipments" will be added to the Posted Transfer Shipments page to allow corrections without forcing you to receive, post a corrective Transfer Order and creating a new, and correct, Transfer Order. 
Key Note: You cannot undo a Transfer Shipment once a Transfer Receipt has been posted.
Modern Tooltips
Tooltips were redesigned to make it easier to read and have improved contents to help self-learning users adapt to Business Central.

Developers can add rich-text variants such as italics and bold to enhance readability.
Add any Table Field to Pages
A long-awaited feature that will be welcomed by many. Although it is not coming immediately, users can add any field using Personalize in a minor release expected in June 2023. All fields will be available and could be added by any person as needed based on their security settings. Developers can concentrate on adding value to BC rather than making fields available.

Drag and Drop Files into BC Documents
Business Central will natively support drag and drop files into the File Upload dialog page. No more fumbling around looking for a file you already have in another window, simply drag it into Business Central, and you are done!
Use Your Keyboard More with Visible Shortcuts
Although it is not a new feature, shortcuts have existed for a while, but the user needed to know or had to pay attention to the Tooltip advertising a shortcut; in BC 23, shortcuts will be visible when you press the Alt key and give you a way to become more efficient without using your mouse.

Reduce Clicks, Add Common Actions to the Actions Bar
The Action Bar has been redesigned to make more useful functionality readily available, reducing the number of clicks. If a common function is buried in a menu, drag it to the Action Bar or another more available menu.
Single-option menus can replace the menu by dragging the only option onto the Action Bar.


This change will also apply to subforms and Lines.
Get Asked to Reopen and Order if Changes are Required
After finding that field you need to change and making the changes, the system tells you a vague message that, in essence, means the Order has the status Released and cannot be modified until you reopen it, argh! Soon, BC will ask you if you want to reopen the Order to continue, allowing you to change the status and make the changes without getting an error message.

For questions about these functions or how to maximize your Microsoft Dynamics investment please reach out to us at Support@BondConsultingServices.com or Click Here to Schedule a Free Consultation with one of our experts.

How-to Adjust 1099s in Business Central
When processing IRS 1099 forms, we often find adjustments to 1099 amounts are required.
Transaction level adjustments may be required because:
- A portion of the invoice is not a 1099 event (i.e. reimbursable expense.)
- Transactions were processed before the 1099 information was set on the vendor card.
- Transactions are coded to the wrong IRS 1099 Code or a vendor may be subject to multiple 1099 forms types.
1099 Form-Box adjustments may be required because:
- No transaction exists to adjust (i.e. migrated from another system.)
- Mass adjustment to the 1099 amount without having to change each transaction for the vendor.
For companies with Binary Stream Muli-Entity Management (MEM) installed, small variations are noted to adjust 1099s Form-Box by Entity.
- Vendor: Set up IRS 1099 Default on Vendor Card

Transaction Level 1099 Adjustments
Vendor Ledger Entries: Select Edit List and modify IRS 1099 Code and/or 1099 Amount.

- 1099 Forms Boxes: Select Form and Update Forms Box to update 1099 forms box with the sum of vendor transactions. This must be run each time you update transactions.

For MEM, after Update Form Boxes, select Update MEM Form Boxes to update forms by Entity.

- 1099 Nec (or other form) 2022 or MEM 1099 Nec (or other form) 2022: To print forms with adjustments.

Form-Box Level 1099 Adjustments (See MEM Variation Below)
- 1099 Forms Boxes: Select Update Forms Box to update 1099 forms box, select the relevant form Code and the Adjustments Exists number or Adjustments button.

Enter Vendor No., Year, and Amount of box adjustment.

Note that you can copy/paste multiple lines from Excel into the IRS 1099 Adjustments Window

- 1099 Form Boxes → Update Form Boxes to update the box amount by the total Transaction 1099 Amounts + Adjustments.
- 1099 Nec (or other form) 2022: To print forms with adjustments.

Form-Box Level 1099 Adjustments – MEM Variation
Rather than make form level adjustments in the 1099 Form Box, use the following process to make adjustments to each Entity:
- Dimension → Dimension → Dimension Values → Select Entity → MEM Entity Setup → 1099 Form Box → Select Code → Process > Adjustments or Adjustment Exists value
Edit List and enter manually or copy/paste from Excel.

- Dimension → Dimension → Dimension Values → Select Entity → MEM Entity Setup → 1099 Form Box → Update Form Boxes
And
- Dimension → Dimension → Dimension Values → Select Entity → MEM Entity Setup → 1099 Form Box → Update MEM Form Boxes

For any questions about processing these forms using Dynamics please reach out to us at Support@BondConsultingServices.com or click here to schedule a free consultation with one of our experts.

How to Reverse an Invoiced Purchase Receipt
The Undo Receipt option is no longer possible when a Receipt has been invoiced. The correction might involve reopening the Posted Purchase Invoice, creating a Purchase Return Order, and recreating the Purchase Order.
Reopen the Purchase Invoice if a payment has been made:
- Search "Vendor Ledger Entries" and filter by the Vendor No. and Document Type = Invoice.
- Find the Invoice, then click on Process > Unapply Entries

- Click on Unapply and confirm with Yes.Note the "Invoice No." as it will be used further in the procedure.Create a Purchase Return Order
- Navigate to Purchase Return Orders
- Create a new Purchase Return Order for the required Vendor. Change any information in the header if required, including adding a Cr. Memo number.
- Use the menu Prepare > Get Posted Lines to Reverse, and locate the Posted Purchase Invoice lines; you could also use other documents.
- Turn on the "Return Original Quantity" toggle if some units have been sold or consumed.
- Select the lines to reverse, use Select More if required, and click OK.

The system might warn about possible cost adjustments for existing entries.

- When the lines are imported, make any corrections and select a Return Reason Code if required.
If you want to close the original Invoice when posting the Purchase Return, use Process > Apply Entries to apply the new Credit Memo with the original Invoice. Just use the Set Applies to ID and click OK.

- Post the Invoice (Cr. Memo) – using Ship and Invoice.
Recreate the Purchase Order
- Create a new Purchase Order for the same Vendor.
- Use Prepare > Copy Document to recreate the Purchase Order.
- Select Document Type = Posted Invoice (or any other type that might have the information)
- Find the correct Document No. (Invoice No.)
- Confirm the Buy-From Vendor No./Name
- Turn on the toggle "Include Header" and do not recalculate the lines; click OK

- Validate the information that matches the original Purchase Order, make any necessary corrections and post the Receipt.
For any further questions about this process or how to optimize your business' ERP environment with Dynamics 365 Business Central please reach out to our team at Support@BondConsultingServices.com or click here to schedule a consultation with one of our experts.

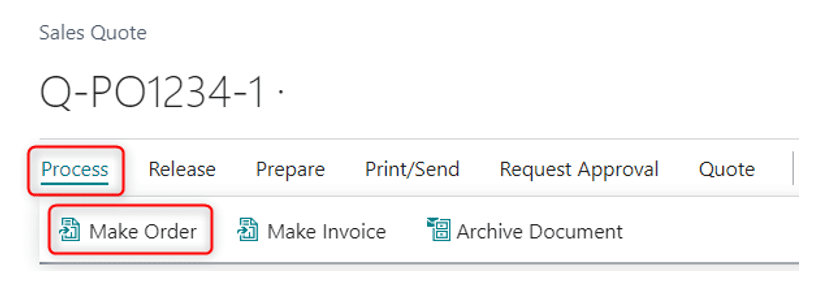
How-to Use the Same Number on a Sales Quote and Sales Order
In Dynamics 365 Business Central (BC), we have number series that assigns the next sequential number to any new transaction. Due to this, a quote can have a different number assigned when it gets converted to an order. (Example: QTE0005 can become ORD0010).
Customers have begun to ask if there is a way to keep the same number across different transaction types, so we have created a customization that will use the same number and add a prefix to define the transaction type. (Samples below)


We can let the customers define the transaction prefix as needed and the transaction types they would like the number to be the same. The more transaction types, the greater the effort.
If you are interested in this custom numbering, please reach out to us at Support@BondConsultingServices.com or schedule a consultation with one of our experts.

How-To Track Expired Orders Using the Incoming Delivery Dashboard
NuBeTech’s free tool, Incoming Delivery Dashboard, is useful for those wanting complete visibility on incoming deliveries. This free add-on for Dynamics 365 Business Central manages incoming deliveries for your purchases, including on Purchase Orders, Quotes, Invoices, Credit Memos, Blanket Orders, and Return Orders. By daily accessing Incoming Delivery Dashboard, you can easily recognize which lines have an expired “Expected Receipt Date”.
This Dashboard groups these documents into a single page, letting you filter them according to any of the following criteria:
- Document Type
- Vendor No.
- Outstanding Quantities
- Document Status
- Document Date
- Gen. Bus. Posting Group
- Gen. Prod. Posting Group
Within the page header, enable “Only outstanding qt.ies.” if you want to look at lines where outstanding quantities are greater than zero. Click “Update Line”, to refresh the page:

The displayed document numbers are color coded, so you can easily check the "Expected Receipt Date" of every line.
For lines with outstanding quantities greater than zero, color depends upon the Expected Receipt Date.
Red: The “Expected Receipt Date” is before Business Central’s “Work Date”.
Yellow: The “Expected Receipt Date” is after the “Work Date” but before the warning date.
Green: The warning date is after or corresponds exactly to the “Work Date”.

As with any List Page, you can take advantage of Microsoft’s “Share” button to export the filtered data to Microsoft Excel:

Business Use Case
One important goal in any distribution environment is to keep track of expired Purchase Orders not delivered yet, as shown in the following example:


Setup
Accessing “Purchases & Payables Setup” within Business Central allows you to set up the Dashboard.
After clicking the “Incoming Delivery Dashboard” FastTab, enter a number within “Warning Range Days”.
For example, entering “5” means that document numbers containing Expected Receipt Dates that will occur five days from now will be colored in yellow:

For any additional questions about this process or how Incoming Delivery Dashboard can help your Business Central environment, please reach out to us at Support@BondConsultingServices.com

How Often Does Business Central Update
Managing change in a cloud environment can be challenging because upgrades are generally pushed automatically. Advance notification is provided for major updates which provides an opportunity to prepare, review, and test, if desired.
TimeLine for Major & Minor Updates
Managing Updates in the Admin Center
Notifications
Warnings and notifications may be delivered in the form of e-mail and/or informational banners or windows displayed when logged in to Business Central.
Dynamics 365 Business Central Admin Center

Environments > Production > Update Settings

Environments > (Environment) > Manage Apps (Incl. 3rd Party Extensions)

Microsoft products automatically update. Generally, third-party apps will update in the weeks following a Microsoft update. Reach out to the publisher to get information on functionality changes.
When an app “Available Update Action,” is “Install update,” the Latest Available Version will be different than the Installed Version and an Action will be available.

Extension Management in Business Central
- Extension Management

- Extension Installation Status

Third Party (non-Microsoft) Extensions
If third-Party extensions are installed from the Extension Marketplace, review their configuration/subscription/setup windows for notification options. Check to see how they notify users of updates and new functionality.
- Extension Marketplace

Select an app to find links to user guides and Help for the extension.
Custom Code Extensions
Future updates are available in advance and can be applied to sandbox environments to test customized code. Whenever there is a concern that critical customizations may be compromised by an update, test updates with custom code in advance in a sandbox environment.
Testing Custom Code or Extensions
If there is a significant risk of negative impacts from updates, BCS suggests testing updates, beforehand, in a sandbox environment. Microsoft releases major upgrades, in advance, for this purpose. This process is particularly important if you have significant customizations.
Support
Contact Bond Consulting Services at support@lime-falcon-860444.hostingersite.com and/or Third-Party extension publisher(s) if you have concerns regarding an upcoming update or problems resulting from an applied update. Please note that BCS does not control updates from Microsoft nor the changes that result.